
This thing is far from complete, but I wanted to get it up and get some feedback. The concept is simple. You've got a pair of skis that are drilled for Dukes, but you want to run Dynafit occasionally and you don't want to drill another set of holes in your skis. Jondrums makes a great product that will mount Dukes or Dynafit, but you need to drill another set of holes. That's fine if you are working with undrilled skis and don't mind a little extra stack height on your Dukes, but my skis are already drilled for Dukes and I don't want them stacked up on a plate.
UPDATE: For the actual tutorial, check out post #43.
So I made a plate out of a cutting board. It's intended to be a prototype, but this stuff is dense polypropylene. You'll notice some TeeNuts, I'm a huge fan of the bindingfreedom.com inserts, but you'll see later on why I went with TeeNuts.
I'll save the specifics for later, this is just concept. You need to do some thinking when you are figuring your layout. There is plenty of room to make this work with one binding and I'm fairly confident I could get Salomon STH16 on this plate too.
My alpine boots have a BSL of 325. My AT boots have a BSL of 320. I'll explain why I'm marking the center at 335 later, but anybody that has tried to do this already knows what I'm up to.
Here is some more marking stuff. I'll probably edit some comments in later. Use the paper binding templates. They are a great resource.
So I've got some holes now. The only ones drilled out are for the Duke toe. They need to be countersunk so the screw head will be flush on the surface.
So here is my ski drilled for Dukes with bindingfreedom inserts installed. Needless to say, this operation won't work unless you have inserts installed in the skis. Pay no attention to the blacked out holes, those are for my SollyFit plates.
Plate goes on. Yes, I will be trimming it down eventually.
Screws go in the Duke footprint.
TeeNuts come up from the bottom and allow you to mount your Dynafits. You need something threaded so you can install and remove your bindings without wearing the plates out. The other reason for using TeeNuts is that they can be moved to different holes. So if I have another pair of skis drilled for Dynafit, I could use the same plates to mount my Dukes. Just move the TeeNuts to different holes. That might not be very practical with Duke and Dynafit, but Dynafit and STH16 sure is to me.
Moving to the rear. Same process.
There is one trick, and you can probably catch it now that the plate is setup. The rear holes on the Duke are the same size as the Dynafit. So I'm gonna use them. I only need two TeeNuts here for the front two holes of the Dynafit binding. The rearmost holes will be mounted straight through the plate and into the ski itself.
I don't have a picture of the rear Dynafit binding set up on the rear plate because I didn't bother to take them off my other skis. This thing got thrown together just this afternoon. Bought some pieces at Lowe's and worked on it until now.
Curious to hear some thoughts. It's not perfect, but I like where it's headed and I've got a few other ideas that might make this a pretty slick little setup.
Results 1 to 25 of 108
-
10-11-2011, 10:16 PM #1

 ..and 90% hair.
- Join Date
- Apr 2008
- Location
- Portland
- Posts
- 246
DIY Binding Adapter Plate - Duke to Dynafit to ???
Last edited by 10% Groomed; 02-11-2013 at 10:05 PM.
-
10-11-2011, 10:23 PM #2
 zeroforhire
- Join Date
- Nov 2006
- Location
- Seattle
- Posts
- 2,217
Very interesting. I am sure many more who are more tech savvy will respond.... Subscribed.
-
10-11-2011, 10:53 PM #3
 ISO Shrubbery
- Join Date
- Dec 2004
- Location
- SoCal
- Posts
- 6,770
That's a very interesting idea, I think I read something similar a couple weeks ago, can't remember where....
Were you able to find 5mm stainless t-nuts? Damn things are rare as hen's teeth, at least in the US.
-
10-11-2011, 11:17 PM #4
Registered User
- Join Date
- Jan 2008
- Location
- Idaho
- Posts
- 449
I think thats a great idea and honestly something I've been waiting to see come about. Good work!
-
10-12-2011, 12:04 AM #5
..and 90% hair.
- Join Date
- Apr 2008
- Location
- Portland
- Posts
- 246
.....you probably heard it in your own thread. I tried tossing the idea out in there, but it didn't get any comments so I figured some pictures would help people to understand what I was talking about. Here is a link to your thread. Originally Posted by 1000-oaks

These teenuts are not stainless. This is just a test/proto. I'll use stainless once I get the system a little more dialed in.
-
10-12-2011, 12:26 AM #6
 Registered User
- Join Date
- Nov 2007
- Location
- sfbay
- Posts
- 2,179
nice work! I think this will work very well. The zinc-plated t-nuts should work for a season, but be sure to let your skis dry well before storing them. I've not come across a source for SS metric t-nuts either.
This really is a lot of work to avoid a few more inserts installed in the ski, but it will make swapping a good bit easier. A word of warning - unless you place the dynafit heel in just the right place, you'll have to move the heelpost to access the mounting screws, then move it back to set the "forward pressure." Its quite annoying, especially if you use brakes.
-
10-12-2011, 01:21 AM #7

 Registered User

- Join Date
- Oct 2003
- Location
- Seattle
- Posts
- 5,486
Dude, thank you for posting this! Very cool idea. I myself am trying to decide how to mount up a pair of skis that will have alpine bindings mounted 75% of the time and dynafits the other 25% and I'm looking for a way to swap without adding stack height to my alpine bindings. This could be the trick.
-
10-12-2011, 08:08 AM #8
ISO Shrubbery
- Join Date
- Dec 2004
- Location
- SoCal
- Posts
- 6,770
Excellent photos and write up to illustrate the cutting board / polyethylene plate route, well done!
I think BindingFreedom may soon offer an aluminum version, and there's another player in the game but their adapters are still in development. They should be announced in the near future though.
Maybe a TGR member in Europe could do a quick Google search for a good source for 5mm stainless t-nuts? Tricky figuring out what they're called in German or Italian, Google Translator doesn't really cut it for technical terms. Originally Posted by 10% Groomed
When I was sketching out my one-off aluminum plates, I was also going to use t-nuts instead of tapping the aluminum. In the other thread Marshal suggested attaching the bindings to the plastic plates with the coarse ski screws that come with the bindings, seems like a great way to do it with DIY breadboard plates.
-
10-12-2011, 08:14 AM #9
ISO Shrubbery
- Join Date
- Dec 2004
- Location
- SoCal
- Posts
- 6,770
Oh, now I see how the Dynafit toe covers up the Duke holes, so you want t-nuts instead of coarse screws in the plastic. With the Plum toe the Duke screws are accessible, so you only need to attach the toe to the plate once.
-
10-12-2011, 08:53 AM #10
..and 90% hair.
- Join Date
- Apr 2008
- Location
- Portland
- Posts
- 246
I saw stainless tee nuts at Lowe's when I was looking for parts. I just didn't want to pay $5 when I wasn't sure about the size. The zinc nuts are about $1.
Here is one.
Just do a search on the Lowe's website for "stainless tee nuts".
Or if you are looking for a big pile, maybe check out their supplier. The Hillman Group.
-
10-12-2011, 02:35 PM #11
 is tipping
- Join Date
- Nov 2004
- Location
- Zigzag, Oregon
- Posts
- 727
I dig it.
I've been thinking of something along the lines of this, and Im glad you're doing it.
-
10-12-2011, 08:41 PM #12
 Not your guy, buddy
- Join Date
- Oct 2008
- Location
- PDX
- Posts
- 775
Looks like someone had a safety meeting and went all MacGuyver, but I like it.
-
10-13-2011, 11:44 PM #13
..and 90% hair.
- Join Date
- Apr 2008
- Location
- Portland
- Posts
- 246
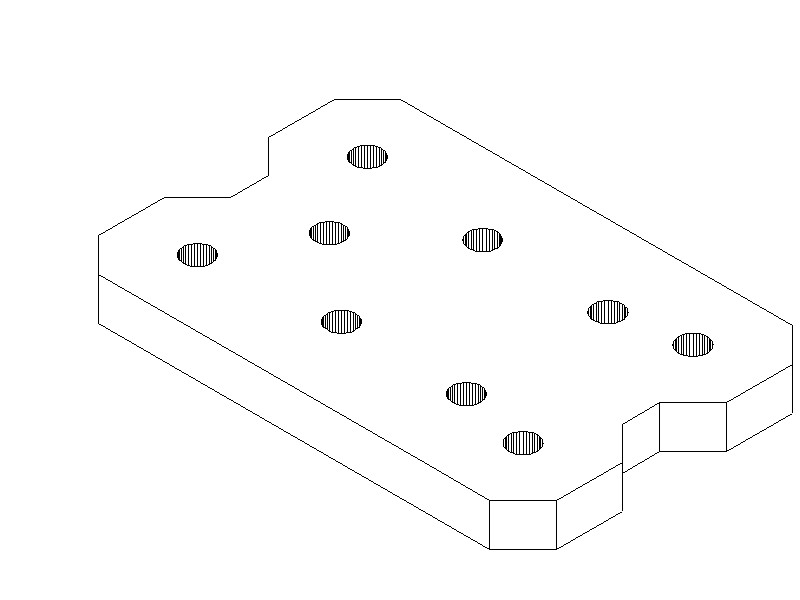
I did some CAD drawings. It's going to be much easier to lay one paper template down than to keep the Duke template and the Dynafit template all lined up. I'm trying to keep this simple enough for a DIY garage special, without getting hokey.
Here is a model of what the plate will likely look like. You could keep the plate square if you wanted to keep it simple, but you should consider cutting the notch in the front for the Dynafit lever when it is down.
I've drilled a prototype and mounted it all up. I wanted to confirm that everything will work, and it does. With a 320 BSL boot and a large Duke, you can get this hole arrangement to work. Anything larger than a 320 BSL should have no problems fitting, but 320 is the minimum. You only get about 5mm of room to adjust forward.

One thing I'm pushing for is to get rid of the plate that comes with these bindings. I won't be using the crampon with these boards, so why carry the extra weight. This also helps me get the binding down a little lower on the ski.
I will elaborate on the rear mount later. A few surprises coming there too.
-
10-13-2011, 11:47 PM #14
Registered User
- Join Date
- Nov 2007
- Location
- sfbay
- Posts
- 2,179
Most people I know are trying to RAISE the dynafit toes, because of how much ramp angle there is in those bindings.
-
10-14-2011, 12:07 AM #15
 taps all holes
- Join Date
- Dec 2009
- Location
- WA
- Posts
- 2,524
No comment yet. I'm just excited to watch this project proceed. Stoked for your winter!
-
10-14-2011, 12:13 AM #16
 Hello
Hello
- Join Date
- Sep 2006
- Location
- North Van
- Posts
- 3,821
Anyone know how this lines up with Small Dukes? Originally Posted by 10% Groomed
Nice job, btw.
-
10-14-2011, 01:03 AM #17
..and 90% hair.
- Join Date
- Apr 2008
- Location
- Portland
- Posts
- 246
Those people can forgo the rear adapter plate and just mount straight to the ski. If you use two of the existing rear holes, you are only installing two new inserts in your skis.....or is there another alternative? I don't want to spoil all of the surprises. Originally Posted by jondrums

Depends on your BSL. What are you working with? Originally Posted by D(C)
The small Duke moves the heel piece forward 40mm. A Dynafit Vertical/Comfort has about 26mm of room to adjust. My head is way too foggy, but I think that means you need to be 306 or less. Let me think about this for a while.
-
10-14-2011, 06:16 AM #18
 Registered User
- Join Date
- Sep 2009
- Location
- EC
- Posts
- 1,061
This. Originally Posted by D(C)
I'm interested in making some of these - thanks for the write-up, I'll stay tuned for updates.
-
10-14-2011, 05:34 PM #19
 S.D.M.F.
- Join Date
- Nov 2005
- Location
- AR/SLC
- Posts
- 739
I'm fired up about these, whether poly or aluminum. I want to go this route, like I said in the other thread, I like the idea of using the Duke jig, then putting in inserts. Then Dukes will be down, flat to the ski. I like!!
"... when I turn, I just hope it hits me in the face."--Shroder Baker/Under the Influence
-
10-14-2011, 07:27 PM #20
..and 90% hair.
- Join Date
- Apr 2008
- Location
- Portland
- Posts
- 246
Here are a couple more photos as the toe gets a little more refined. The first one shows just how much height you are picking up in the toe. Only a couple mm. The plate that comes with the Dynafit has some ramp to it. This new plate is flat which might be better for those of you that are trying to drop the heel piece and reduce your ramp angle.

Next shot shows the plate mounted to the ski. The depression in the middle allows the Dynafit binding to articulate otherwise it would bottom out and not open up all the way.

Here is a shot of the touring lever engaged.

The heel is coming together nicely. I might even take these out for a test spin this weekend. Oh, it's good to be near Mt. Hood.
-
10-14-2011, 08:18 PM #21
 Registered User
- Join Date
- Jan 2006
- Location
- Alpine Meadows, CA
- Posts
- 4,461
Does it stay in touring mode? By removing the plastic base plate, you've eliminated the little nubs that the toe lever ratchets onto when you pull it up to fully engage tour mode? I suspect it will work fine without that, but you're opening yourself to an inadvertent release if you knock down the lever and then twist.
**
I'm a cougar, not a MILF! I have to protect my rep! - bklyn
In any case, if you're ever really in this situation make sure you at least bargain in a couple of fluffers.
-snowsprite
-
10-15-2011, 12:48 AM #22
..and 90% hair.
- Join Date
- Apr 2008
- Location
- Portland
- Posts
- 246
It touches the plate, but nothing like the little nubs on the original plate. I will probably add something to the plate so the lever can ratchet. Originally Posted by Sinecure
-
10-15-2011, 10:10 AM #23
Registered User
- Join Date
- Mar 2009
- Location
- Aspen, Colorado
- Posts
- 2,644
I'd bet you could sandwich a thin sheet of stainless steel between the binding and the red block. You could press some dimples into it for the lever to ratchet onto
-
10-15-2011, 10:52 AM #24
Not your guy, buddy
- Join Date
- Oct 2008
- Location
- PDX
- Posts
- 775
This is really coming along nicely. Can't wait to see the heel.
-
10-15-2011, 11:37 AM #25
..and 90% hair.
- Join Date
- Apr 2008
- Location
- Portland
- Posts
- 246
If you look really closely in the last picture, you can see that the lever is coming down very near to where the holes are coutersunk for the adapter plate. If you aren't going to use the plate that comes with the Dynafit bindings, you don't need to worry about this point of attachment being totally flush. You could use an "oval head" bolt which will give you a little bit of rise and might have enough for the lever to bite onto. I'll tinker around with that and post some pictures if it works. Originally Posted by Jethro
Or you might be able to create your own dimples in the block itself with a soldering iron. Heat it up and displace a bulge of material. It's not going to take much. The lever is already in contact with the plate.


 Reply With Quote
Bookmarks