
There are a couple options with the heel. I wanted to throw them all out and see which is the most popular option.
Option #1
Make another plate, just like the first one and stick Dynafit heel on top of it. The front two holes in the adapter plate would mount directly to the ski, the next two holes would mount directly to the binding via tee nuts, and the last two holes would be through bolted to the ski.
Option #2
Drill two new holes in your ski and install inserts. Use the rearmost holes from your existing Duke installation for the rearmost holes in your Dynafits. This might be the least complicated option, but it requires two new holes in your skis. People that want to reduce ramp angle might prefer this route.
Option #3
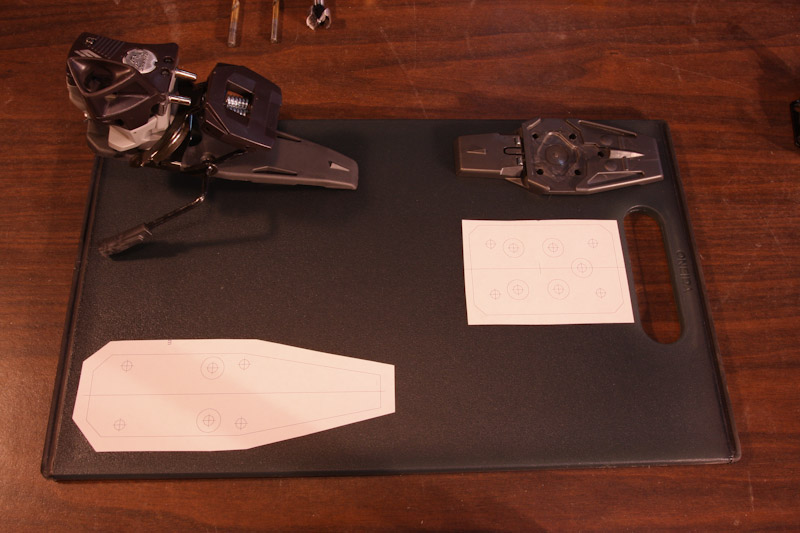
Drill two new holes in your Dynafit binding. I can already hear the grumbling, but take a look. We know the rearmost holes line up. So stick your Duke heel plate on the bottom of your Dynafit binding and see where you will be drilling holes.
Make a little mark where the holes will go with a sharpie and pull the plate off.
Take a closer look. Add epoxy to the bottom of the plate in the red area. Carefully drill the holes from the bottom up and use a pan head fastener with no countersink.
I don't believe there will be any interference from the brake or binding with the new holes or fasteners even if they are not flush mounted in a countersunk hole. There is plenty of height clearance as the binding moves forward.
So how strong will the plate be? The epoxy won't do much except help support the plate and help the fastener get a nice strong bite. It is reinforcing the bottom of the plate and displacing the downward pressure on the ski. (Don't forget that the ski really is part of the binding once it is all bolted together.) Also, if you look back to see how much material is actually holding the heel post to the plate, you might be surprised. Take a look at how much material is holding your Duke plate to the ski. It's the top half of a countersunk hole. Not much material there.
I'm confident the modified Dynafit plate will work, but I'm not sure it will be easier than drilling two new holes in my skis. I'm not too worried about drilling the holes in my Dynafits since they would be outside of the existing holes and heel post. The new holes shouldn't compromise the strength of the original holes or binding.
Results 26 to 50 of 108
-
10-15-2011, 01:34 PM #26

 ..and 90% hair.
- Join Date
- Apr 2008
- Location
- Portland
- Posts
- 246
-
10-15-2011, 04:19 PM #27
 Registered User
- Join Date
- Nov 2007
- Location
- sfbay
- Posts
- 2,179
very nice craftsmanship
-
10-15-2011, 06:09 PM #28

 Hello
Hello
- Join Date
- Sep 2006
- Location
- North Van
- Posts
- 3,821
To me, #2 sounds pretty good. I already add 6mm of shims under my dynafit toe to reduce the ramp, so having a front plate and the heel flat makes sense, and 2 extra holes far away from the others is no biggie.
-
10-15-2011, 07:53 PM #29
Registered User
- Join Date
- Mar 2009
- Location
- Aspen, Colorado
- Posts
- 2,644
I like option #1, but I am happy with the ramp angle of Dynafits.
-
10-15-2011, 08:00 PM #30
Registered User
- Join Date
- Nov 2007
- Location
- sfbay
- Posts
- 2,179
For option #3, use some JB weld stick to fill in the red area. You'll probably want to scratch up the surface real good with some sandpaper. Even if it doesn't adhere perfectly, the purpose is to provide support, which it will do.
Doesn't seem like doing this will damage the bindings, but it will certainly not be as strong a mount as the stock arrangement. That plastic baseplate is only so strong, and spreading out the fasteners may or may not be a problem.
-
10-15-2011, 08:43 PM #31
 Registered User
- Join Date
- Oct 2008
- Location
- Somewhere else
- Posts
- 5,791
Very cool! Option #2 sounds best to me.
Just had a look at the base plate on my older Comforts and it doesn't look to me like there is enough plastic to be drilling out two more holes for option #3 with Comforts... fyi.Goal: ski in the 2018/19 season
-
10-15-2011, 09:56 PM #32
 ISO Shrubbery
- Join Date
- Dec 2004
- Location
- SoCal
- Posts
- 6,770
If you could grind enough clearance in the the bottom of the brake pedal (not sure if there's anything structural in the way, just brainstorming here) to fit a little steel flat bar under it, you could have a steel strap with a hole in each end for the binding screws across the top of the plastic baseplate. With a strap clamping the plastic plate to the ski I think you'd be okay, but don't think the epoxy-fill idea will hold the upward loading. Those two screws will see a lot of pull whenever you load the tips of the ski.
With the X-shaped foot you have on that particular Dynafit model, it would be pretty easy to mill a whole new aluminum baseplate for the heel, with the Duke pattern and the edge dovetails for attaching the brake. (Just like the idea for Plum bindings in my thread, which wouldn't work with the Dynafit Speed because the foot doesn't have the corners notched out.)
-
10-16-2011, 11:08 AM #33
 taps all holes
- Join Date
- Dec 2009
- Location
- WA
- Posts
- 2,524
Aside from the sketchiness associated with Option 2, it's also incompatible with other "tech" bindings. It would be nice if your system could work with Plums, future Dynafits, etc. Originally Posted by 10% Groomed

I think that Option 1 preserves greater compatibility with other tech bindings, preserves the existing ramp angle (which I like) and weakens the system the least.
Good luck on this project. It's fun to see.
-
10-16-2011, 12:34 PM #34
Registered User
- Join Date
- Jan 2004
- Location
- North Vancouver
- Posts
- 6,473
If you had access to a mill you could make a whole new base plate from the cutting board.
Nice project.
-
10-16-2011, 01:57 PM #35
..and 90% hair.
- Join Date
- Apr 2008
- Location
- Portland
- Posts
- 246
To the best of my knowledge, most tech bindings use the same footprint. With the exception of the new Dynafit Radical toe, Dynafit installation holes haven't changed in a couple decades. Some of their skis are even pre-drilled for installation of tech bindings. (Take a look at the Dynafit Stoke.) Plum knows this. That is probably why they kept their hole pattern identical to the Dynafit. I'm not sure about La Sportiva. Originally Posted by skimaxpower
So here is my train of thought on the three options.
Option #1 - Build a separate plate for the heel.
This is so easy to do that I'll probably just go ahead and build one. Also, some people like the ramp angle the Dynafits come with. The paper template I'm working on will have plans for a toe and a heel. Just about anybody should be able to knock these out in their garage within an hour or two.
Option #2 - Drill two new holes in my skis.
This is probably my preferred option. If I use the new adapter on the toe and drop the Dynafit plate, the weight penalty is minimal and the net height is raised about 2mm. Not very much. The heel goes on just like normal and the ramp angle flattens out just a touch. I'm a big fan of the binding freedom inserts. Installing two of these on each ski seems very practical. They are far enough away from the Duke holes that I'm not worried about conflicts.
Option #3 - Drill two new holes in my bindings.
I like this idea in theory, but I realize most people don't want to go this route. I would be a little more inclined if the Dynafit plate was just a little bigger. I think Jondrums is right on about the JB Weld putty. This area doesn't need to be fused together, it just needs to support the plate from underneath when the fasteners are tightened down.
Option #4 - Mill a new plate to replace the Dynafit one.
This is the ideal option in my mind. I've been tossing around all kinds of ways to mill this out of a cutting board, but I don't think the material is strong enough. If somebody wants to make these out of aluminum, I would be stoked. I've got a few ideas I'm still playing with here, but it's gonna be tricky to keep it as a simple DIY project.
-
10-17-2011, 02:30 AM #36
taps all holes
- Join Date
- Dec 2009
- Location
- WA
- Posts
- 2,524
You're correct. I simply mis-read the numbers in your post at the top of this page. Option #3 is the one that I don't like because it's incompatible with Plums or other tech bindings. Originally Posted by 10% Groomed
I still think that Option #1 is best. (But I like the ramp angle.)
-
10-18-2011, 09:45 PM #37
Registered User
- Join Date
- Oct 2008
- Location
- Somewhere else
- Posts
- 5,791
I noticed that you're using tee nuts without the teeth... how do you keep them from spinning when you're tightening the binding onto the plate?
Are you tightening the dynafit binding onto the plate before installing the plate on the ski with inserts for Dukes... and just holding the tee nut to keep it from spinning?Goal: ski in the 2018/19 season
-
10-19-2011, 12:13 AM #38
..and 90% hair.
- Join Date
- Apr 2008
- Location
- Portland
- Posts
- 246
^^^I haven't had a problem with a spinner yet. Everything is fitting so snug that there is a good bite on the tee nut by the time it gets pulled into it's recessed hole. These tee nuts do have brad holes that could be used if things start to slip.
-
10-19-2011, 04:26 PM #39
Registered User
- Join Date
- Oct 2008
- Location
- Somewhere else
- Posts
- 5,791
... and what are you using for an SAE fastener for the 5th hole on the toe-piece (to fit through the narrower opening that standard fasteners won't fit through)?
Goal: ski in the 2018/19 season
-
10-19-2011, 06:52 PM #40
..and 90% hair.
- Join Date
- Apr 2008
- Location
- Portland
- Posts
- 246
Hmmmm....I must be doing something wrong because the same fastener is fitting through the 5th hole that is fitting through all the other holes. Originally Posted by Shorty_J
-
10-19-2011, 07:57 PM #41
Registered User
- Join Date
- Oct 2008
- Location
- Somewhere else
- Posts
- 5,791
If it's working, don't question it!
 Goal: ski in the 2018/19 season
-
10-19-2011, 08:02 PM #42
Registered User
- Join Date
- Nov 2007
- Location
- sfbay
- Posts
- 2,179
It fits through the hole, it just doesn't fit through the ski/tour lever opening to install vertically which is a hassle but not the end of the world as you found. Originally Posted by 10% Groomed
-
10-22-2011, 04:18 PM #43
..and 90% hair.
- Join Date
- Apr 2008
- Location
- Portland
- Posts
- 246
So here is a start on the tutorial. The template is pretty much dialed, but I'm not posting it up until I get a chance to get these out on the snow. I just don't want to put my name on something until I'm convinced it works.
The cutting board is nothing special. I got mine at Bed Bath & Beyond for about $13. They have a couple colors to choose from. Your skis need to have Binding Freedom inserts installed. Plan on using the metric fasteners that come with that system to attach the adapter plate to the ski.
Most people will already have the drill bits (7/32" and 1/4"). Some people will already have a countersink bit. I'm guessing most will need to buy the Forstner bit. It's 3/4" and should cost you less than $10. I like to use a scribe as a centerpunch. A nice sharp point makes for a tightly drilled setup.
The fasteners are all Zinc. I think stainless steel are ideal, but they are a little spendy for testing. Right now I'm using a 10-24 x 9/32 tee nut with a 3/4" brad nail base. I will probably move to a 10-32 thread pattern. I don't think these will be vibrating loose, but the 10-32 will improve your odds. Metric tee nuts would be nice, but they are pretty hard to come by in a stainless steel.

Start out by cutting your template into pieces that are close to your binding footprint and figure out what you can get out of your board. In this tutorial, I'm making a pair of heel plates and two pair of toe plates. One pair will fit the plastic plate that comes with my Dynafits, the other pair will omit the plastic plate that comes with my Dynafits.
Once you've got a suitable arrangement, start punching holes. The key to keeping this whole operation square is to get the holes marked from a single template. The template has both the Duke holes and the Dynafit holes on it. As long as you get these drilled square, your adapter plate can take any form and not affect the alignment. Kinda handy when you figure some people are doing this for Plum, others for Dynafit.

After you get all of your holes marked by moving the templates around the board, you can cut the board up into more manageable pieces.

Grab your Forstner bit. We start on the bottom of the adapter plate cutting holes for the teenuts. The only holes that need teenuts are the Dynafit holes. If you look closely, I've marked the holes I want to drill in this wave with a Sharpie.

If you have access to a drill press, great. If not, this whole project can be done with a careful hand. (I've actually done all of my Binding Freedom inserts by free-hand, but I wouldn't recommend that for most people.) Sink this cut just deep enough to keep your teenuts flush.

You should look something like this. Notice that you only need to cut two holes in each of the heel pieces. We are only putting two teenuts back there. The rearmost holes will be fastened directly through the plate and into the ski.

Next we drill the holes that attach the adapter plate to your ski. Use the 7/32" bit. These are basically the Duke holes.

After drilling the Duke holes, change to the 1/4" bit and drill out the Dynafit holes.

Here's what your drilling should result in. (Minus the brown bar from a faulty memory card in your camera.)

Flip your board over so we can do some countersinking in the Duke holes. Remember to only do two of the holes in each heel piece, the front most holes. The other four holes will have teenuts or be fastened through to the ski.

After you've finished your countersinking, you are pretty much dialed. You can cut your plate into almost any shape as long as you leave enough material for the Duke holes to get a good bite. The easiest way to match up with your binding is to mount it to the plate and trace its outline.

If you are working on a toe plate that will omit the Dynafit plastic plate, it should look something like this when you are done. You will need to hit the top of the plate with the Forstner bit one last time in order to allow for the pincher arms to articulate in the closed position. Otherwise they will bottom out and not close completely.

This should give everybody enough info to start thinking about parts. I'll post up some finished products and the template after I've had a chance to run around on the snow a little bit.
-
10-22-2011, 04:22 PM #44
 thisisyourbrainonSONAR
- Join Date
- Oct 2003
- Location
- Everybody Knows This Is Nowhere
- Posts
- 6,584
That's pretty darn cool.
Putting the "core" in corporate, one turn at a time.
Metalmücil 2010 - 2013 "Go Home" album is now a free download
The Bonin Petrels
-
10-22-2011, 05:55 PM #45
Registered User
- Join Date
- Mar 2009
- Location
- Aspen, Colorado
- Posts
- 2,644
You have started the gears turning in my head. I don't have dukes, but I do have some skis I might want to tour on which are mounted with alpine bindings.
-
10-22-2011, 06:29 PM #46
ISO Shrubbery
- Join Date
- Dec 2004
- Location
- SoCal
- Posts
- 6,770
Nicely done! Another advantage of the t-nuts in the toe adapter is you can add additional holes for the Dynafit toe right next to each other (say you want to move the Dynafit toe 5mm forward on the plate for a new BSL) without worrying about the screws migrating into the nearby holes & tearing out. Just punch a new pattern with the Forstner bit and 1/4" drill and move the t-nuts over.
This is exactly what I plan to do, but in aluminum. (If there isn't a commercially-made plate available by the time the snow hits anyway.)
-
10-22-2011, 09:18 PM #47
 S.D.M.F.
- Join Date
- Nov 2005
- Location
- AR/SLC
- Posts
- 739
Get on it. I want a pair for my Plums. I really like both y'alls ideas. Great work.
"... when I turn, I just hope it hits me in the face."--Shroder Baker/Under the Influence
-
10-22-2011, 10:13 PM #48
Registered User
- Join Date
- Mar 2009
- Location
- Aspen, Colorado
- Posts
- 2,644
It would be pretty easy to make the same thing out of 1/4" aluminum sheet stock. What thread pitch/diameter would you use for aluminum if you don't want to use t-nuts? Is Aluminum tough enough for a machine thread screw? What stock does jondrums use for his adapters? He makes awesome products, but the combinations available along with the existing hole compatibility are pretty large.
-
10-22-2011, 10:23 PM #49
Registered User
- Join Date
- Mar 2009
- Location
- Aspen, Colorado
- Posts
- 2,644
I did a quick search of "aluminum Sheet Stock". This was the top google entry.http://www.onlinemetals.com/index.cfm They have sheets of aluminum, a bunch of other metals, and plastic stocks, some of which are glass filled. Just throwing some alternatives out there. 10%, thanks for the ideas and the great craftsmanship.
-
10-22-2011, 11:30 PM #50
ISO Shrubbery
- Join Date
- Dec 2004
- Location
- SoCal
- Posts
- 6,770
Coarse threads are better than fine threads in aluminum, but there aren't a lot of options at that diameter. In similar metals it takes a thead engagement of about 1.25 times the diameter to match the tensile strength of the screw. So a 5mm aluminum screw would about match 7mm of threads in an aluminum plate, but a 5mm steel screw is much stronger than 7mm of aluminum threads in a plate. Thus the beauty of steel t-nuts, but with weight and cost penalties.
As Jondrums has found, 7mm of aluminum thread (times eight) seems to be plenty strong enough for a ski binding though. I assume he's using quality tempered flat bar stock, and the anodizing helps the threads hold up to lots of screw swaps.


 Reply With Quote
Bookmarks