
Early in 2006, I contributed to a discussion on backcountryworld.com about threaded inserts. I detailed how I fitted threaded inserts to three different pairs of skis so that I could move our Freeride bindings between them. This became something of a reference but, sadly, backcountryworld is no more. Fortunately, I kept a copy so I now reproduce it here for your information.
Before we start, I recommend you allow yourself plenty of time for this. You're going to be drilling some big holes in your skis and you'll only get one chance. Refilling and trying again is not an option so make sure you work with the utmost accuracy. If possible, practice on an old pair of skis first.
First of all we need to mark out the holes on the skis. I used the paper pattern available on wildsnow.com. Here, I'm using my dad's old woodworking gauge to find the centre of the ski. With a long line down the middle, positioning of the pattern is much easier.
I used a centre punch to mark the positions and then a pillar drill to make the holes starting with a 2mm drill and working up slowly. It is important not to drill too far so use the depth stop. The tip of each drill bit is chamfered so getting the right depth is awkward. I made sure that, at the outside of the drill, there was about 1mm extra depth clearance for the insert.
Unfortunately, the maximum capacity of my pillar drill is only 6mm so I had to use a cordless drill above that. It's not as easy as you might think to hold back a biting drill - I went all the way through on one hole! So note the piece of nylon tubing I added as a depth stop.
EZ-LOK specify a hole size of 3/8" for their 400-M6 knife thread inserts, I used my nearest equivalent - 9.5mm - and this seemed to work fine.
Once all seven holes are done you have the fun of fitting the inserts. To make sure they stayed vertical, I used a length of M6 stainless studding in the pillar drill. To this I added a large M6 nut and a penny washer and then an insert. Notice that the insert is 'upside down' with the slot at the bottom. This is so that there are fewer ways for water to get in. On the outside of the insert and around the hole I used Dow Corning 3145 high strength sealant. Others may prefer epoxy glue. Avoid using plain mild-steel for the studding - experience says that this isn't strong enough!
I used a 10mm spanner to screw the inserts into the skis. The knife threads on the outside of the inserts is very thin and occasionally would strip off. If this happens then there's nothing for it but to unscrew the insert and try again with a new one. Stop when the penny washer is pressed firmly into the surface of the ski. Sometimes, if you simply start unscrewing, the insert will come back out again. Instead, hold the chuck to stop the insert turning and then use the spanner to take off the pressure. Once it is free you can spin the chuck backwards and undo everything.
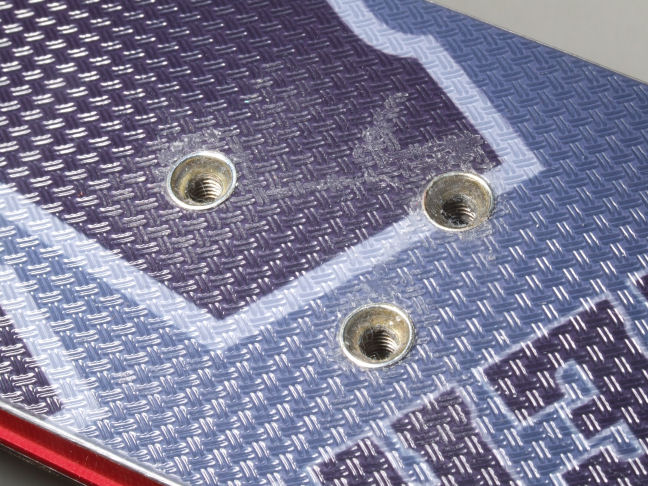
When you've finished you should be left with 7 inserts all flush with the top of the ski like this.
Then simply fit the binding using countersunk screws. I used M6x16 for the toe-piece and M6x20 for the heel and these seem to be perfect. To keep the water out I apply a little Silastic 734 flowable silicone sealant every time.
Notice that the heads are just a little large but they don't foul anything and you get to use a Posidrive #3 screwdriver - just like everything else on skis.
When all is done it should look like this.
Trying to do the same thing with my Kneissl Tankers was something of a trauma. These skis have a metal top and bottom sheet with a softwood, Okume(?), core. The topsheet is so strong that it kept stripping the knife thread from the outside of the inserts. Eventually, I gave up, drilled all the way through the skis, opened out the hole at the bottom and then fitted the inserts from the wrong side. It kinda worked but the wood is so soft that the inserts didn't have a really good grip. I had another idea so I pulled all the inserts out again. Then carefully, using a tiny burr in a mini-drill, removed the wood from behind the topsheet around each hole. Then I countersunk slightly the topside and fitted some Nutserts from Avdel. These expand behind the topsheet, like a pop-rivet, and grip it. For good measure I dripped some Cyanoacrilate (superglue) around the insert from the underside. The results looked good.
Unfortunately, I was left with some holes in the bases. To fill them I fitted the bindings then turned the skis over and dripped candle wax onto the end of the screws. Then I filled in the offending holes with epoxy glue. When this had set, I removed the bindings again, dug out the wax and filed down the excess glue with a radial file. The results are no pretty but at least it worked. It's easy to find my skis now - I just look for the polka dots!
I carry round with me a kit of spares. Notice at mid-left there are two EZ-LOK inserts. The left hand one has been shortened for use on the heel where the skis are thinner. To cut them down I just fitted them to the pillar drill with the studding and then held a file against the end while it was turning. The stud extractor in the middle is useful when things go terribly wrong. On the right, the handwheel is for any in-the-field insertions - which, so far, I have avoided. And just to show you how it works, there's a Nutsert that's been crimped.
Of course, being able to take the bindings off makes packing all your skis into one bag a breeze.
And servicing them is easier too. Although I've yet to make a piece of wood with holes in the same pattern so I can grip the skis easily.

Results 1 to 10 of 10
-
07-03-2010, 02:49 PM #1

 the terminator
- Join Date
- Jan 2009
- Location
- Warrington, UK
- Posts
- 152
Threaded Inserts: original backcountryworld thread
-
07-03-2010, 02:50 PM #2
the terminator
- Join Date
- Jan 2009
- Location
- Warrington, UK
- Posts
- 152
An update from 2009:
The three lots of inserts are still holding up fine - touch wood! The brass is pretty discoloured now but there are no signs of anything more serious. Everything was looking so good that I have just mounted a fourth pair like this for a friend.
Along the way, I have had a few problems with dents in the bases that require some grinding off. I put this down to my use of flowable silicone every time. I think it was accumulating at the bottom of the holes so that the screws would press it onto the back of the base causing it to bow out. I've stopped using the silicone and the problem seems to have receeded.
This difficulty prompted me to look for a better way to create the holes. I couldn't find a Forstner bit of the correct size but I did find a 3/8" router bit. This leaves a hole with a pip in the middle just the right size to fit up inside the inserts! Unfortunately, there is no centre point so it's difficult to line up on the centre of the hole.
My solution was to use a V-groover bit first to line up on the punch marks and then, without moving anything, change over to the 3/8" bit. Note how the ski is clamped down firmly on a sliding table.

I set the depth stop on the pillar drill to 0.5mm more than the height of the insert. Note, I had to do this every time as the depth would change as I swapped the bits round.

Again, I used Dow Corning 3145 RTV high strength silicone down the holes before fitting the inserts and, afterwards, some Silastic 734 self-leveling silicone to seal the bottom.
Others that want to keep their original screws may want to investigate the inserts made by Snoli, type 1302/9/F. These look very similar to the EzLok ones but have a different internal thread. Anyone wanting to fit some bomber inserts might want to check out their 1602/S snowboard inserts.
http://www.maislinger-snoli.com/
I've also used the same hole pattern in some pieces of plywood that I use when servicing the skis.
Note the numbers so I can keep track of which edge I'm up to when swapping back and forth between skis.

These provide more room for tools and knuckles and provide a better surface for the vice to grip.

2010 update:
International Standards:
ISO 5355:2005 Alpine ski-boots -- Requirements and test methods
ISO 8364:2007 Alpine skis and bindings -- Binding mounting area -- Requirements and test methods
ISO 9838:2008 Alpine and touring ski-bindings -- Test soles for ski-binding tests
ISO 9523:2008 Touring ski-boots for adults - interface with touring ski-bindings - requirements and test methods.
ISO 22264:2006 Telemark ski-boots for adults -- Interface with Telemark ski-bindings -- Requirements and test methods
ISO 11088:2006 Assembly, adjustment and inspection of an alpine ski/binding/boot (S-B-B) system
ISO 6004:1991 Alpine skis -- Ski binding screws -- Requirements
ISO 6005:1991 Alpine skis -- Ski binding screws -- Test methods
ISO 10045:1992 Alpine skis; binding mounting area; requirements for test screws
ISO 7050:1983 Cross recessed countersunk (flat) head tapping screws (common head style)
ISO 1478:1999 Tapping screws thread
Alpine binding threads:
DIN 7982CZ countersunk with pozidrive
ISO1478 ST5.5x1.8 - actual thread of self tapping screws
ANSI B 18.6.4 #12 type-AB - commonly used tap - nearest US equivalent
(The 12 AB is marked as M5.3 x 1.81)
Useful threads:
http://www.tetongravity.com/forums/s...dings-on-a-ski
http://www.tetongravity.com/forums/s...erts-into-skis
http://www.tetongravity.com/forums/s...Group-Purchase
http://www.telemarktalk.com/phpBB/viewtopic.php?t=12520
http://www.telemarktalk.com/phpBB/viewtopic.php?t=34239
http://www.telemarktalk.com/phpBB/viewtopic.php?t=39781
http://www.telemarktalk.com/phpBB/vi...c.php?p=439214
http://www.wildsnow.com/1165/randonn...iso-standards/
Some insert manufacturers & suppliers:
http://www.ezlok.com/
http://www.maislinger-snoli.com/
http://www.boellhoff.com/
http://www.tappex.co.uk/
http://www.mcmaster.com/
I am so convinced of the advantages of threaded inserts that, unless there are special reasons, all my future binding mounts will use them. However, they do add weight and this must be a consideration - particularly for touring set-ups. The fragility of the exterior brass fins mean that this is not an ideal material although I have no qualms about it otherwise. The original brass inserts from 2005/2006 are still going strong. These days I would look towards stainless or passivated, case-hardened steel. I would also tend towards inserts with an expanded head. These look neater and provide a better seal against the topsheet to keep any moisture out. The Trisert3 range from Tappex look ideal. They are open ended which allows the best use to be made of the very limited depth available and the bottoms of the holes can easily be sealed with flowable silicone such as Dow Corning 3140.
That said, many have had success with the M5 blind stainless inserts designed by jondrums, produced by puderluder and advertised elsewhere on this forum. These also have machine threads on their exterior rather than deeper self-tapping threads but AFAIK there have been no pull-outs.Last edited by altis; 03-18-2011 at 02:04 PM.
-
07-04-2010, 09:59 AM #3
 Registered User
- Join Date
- Nov 2007
- Location
- sfbay
- Posts
- 2,179
Thanks for posting!
I will add some links to relevant TGR discussion here.
-
12-04-2010, 11:52 PM #4
 Still practicing being 24
- Join Date
- Oct 2008
- Location
- On another tangent.
- Posts
- 4,028
I just discovered this thread and was disheartened to hear backcountryworld is no more, along with that old thread on inserts. A belated thanks for archiving and posting it again Altis. As you know, this topic as well as swapping bindings has been of interest for a while (tele for alpine or AT on the same ski as well as different skis, same bindings).
I found this while trying to get up to speed on the origins and evolution of the stainless steel inserts as well as other insert discussions. Jon (or anybody), do you have those links of relevant TGR discussions? There's a lot to weed through to get to the meat.
Edit: Maybe one of you two guys could answer why the Snoli tap-ins have a higher pullout ratings than their threaded inserts? It seems counter-intuitive and interesting to me.
1302/9/F Brass Inserts, 9mm, fine pull-out resistance 268 kp
vs
1302/S Drive-in Brass Inserts, 8.5 mm pull-out resistance 300 kp
I imagine the expansion and contraction caused by screws in and out of the tap-ins would make the frequent removal of screws for binding swaps less than optimal over time.Last edited by Alpinord; 12-05-2010 at 12:30 AM.
Best regards, Terry
(Direct Contact is best vs PMs)
SlideWright.com
Ski, Snowboard & Tools, Wax and Wares
Repair, Waxing, Tuning, Mounting Tips & more
Add TGR handle to notes & paste 5% TGR Discount code during checkout: 1121TGR
-
12-05-2010, 12:57 AM #5
Registered User
- Join Date
- Nov 2007
- Location
- sfbay
- Posts
- 2,179
Here at TGR, it all started with this thread, where "IKilledJudas" brought to my attention the backcountry world thread posted here. I basically lived in this thread for a few weeks.
[ame="http://tetongravity.com/forums/showthread.php?t=113720"]repeatedly changing ski bindings on a ski [/ame]
PuderLuder started making the inserts available at cost in these two threads (some good installation info here too)
[ame="http://tetongravity.com/forums/showthread.php?t=173708"]Binding Insert Group Purchase[/ame]
[ame="http://www.tetongravity.com/forums/showthread.php?t=179060"]Binding Insert Group Purchase II[/ame]
Then, they became known as "PuderLuder Inserts"
[ame="http://tetongravity.com/forums/showthread.php?t=198148"]Order your Puderluder Binding Inserts[/ame]
Some other threads I've come across that have interesting insert discussion:
[ame="http://tetongravity.com/forums/showthread.php?t=199684"]Binding inserts verses Sollyfits/Dynaduke plates[/ame]
[ame="http://tetongravity.com/forums/showthread.php?t=200631"]Is this swiss cheese legit? Or are there too many puder luder inserts? [/ame]Last edited by jondrums; 12-05-2010 at 01:23 AM.
-
12-05-2010, 09:07 AM #6
Still practicing being 24
- Join Date
- Oct 2008
- Location
- On another tangent.
- Posts
- 4,028
Jon,
So I'm now reading the inserts you helped design are now called PuderLuder/Quiver Killers inserts, correct? Interesting.
What are the differences/pros and cons between Binding Freedom, the Quiver Killer inserts and the Altis preference of brass inserts here and tap-in brass and nylon?
EDIT:
It's probably best to leave this lie in this thread and focus on installation techniques.Last edited by Alpinord; 12-15-2010 at 11:09 PM.
Best regards, Terry
(Direct Contact is best vs PMs)
SlideWright.com
Ski, Snowboard & Tools, Wax and Wares
Repair, Waxing, Tuning, Mounting Tips & more
Add TGR handle to notes & paste 5% TGR Discount code during checkout: 1121TGR
-
12-05-2010, 09:39 AM #7
Still practicing being 24
- Join Date
- Oct 2008
- Location
- On another tangent.
- Posts
- 4,028
When reading this and the multiple bit changes I was wondering WTF? Too many steps. Originally Posted by altis

Coupled with some thoughts relative to vertical tapping, tap guides and other comments in the recent Lou Dawson review at Wildsnow, this morning the light bulb went off and started thinking that a brad tip bit and a dowelling jig is the call for the DIYer insert installer. The tip will be more accurate in a center punched or awled hole and the bit would cut similar to the router bit.

The more time I spend dealing with ski issues, the more I think about woodworking techniques (including t-tracks) and general tools in common.
Before the biscuit jointer, dowelling jigs, dowels and glue were used to more easily create butt joints than other joinery methods like dove tails and mortise and tenon. So I pulled out my old dowel jig with different diameter bushings and some brad tip bits. The jig will clamp securely to a ski and the bushing holders can be slid and locked precisely where you want. Changing bushings allow you to use different diameter bits and AND taps.
Simply put, a dowel jig and bushings assures a precise, vertical and consistent alignment for hand drilling AND tapping. Add a drill bit collar and you can control the depth:


Last edited by Alpinord; 12-12-2010 at 09:09 AM.
Best regards, Terry
(Direct Contact is best vs PMs)
SlideWright.com
Ski, Snowboard & Tools, Wax and Wares
Repair, Waxing, Tuning, Mounting Tips & more
Add TGR handle to notes & paste 5% TGR Discount code during checkout: 1121TGR
-
12-05-2010, 12:13 PM #8
Registered User
- Join Date
- Nov 2007
- Location
- sfbay
- Posts
- 2,179
Terry-
That's the stuff!
I've been thinking along the same lines, and trying to come up with an easy way to create a drill/tap jig to keep things perfectly straight and centered.
Currently, my thinking is that the ski should be drilled and mounted normally first. Then drill the bigger insert holes, and tap them. This has two advantages:
1) one can be sure the holes are in the right spot, and the mount is in the right place - by skiing them once or twice.
2) the smaller holes guide the larger holes to go in the right place (avoiding drill wander)
-
12-05-2010, 05:14 PM #9
Still practicing being 24
- Join Date
- Oct 2008
- Location
- On another tangent.
- Posts
- 4,028
Jon,
By drilling for alpine screws first (ie, pilot holes) the brad tip may wander and a regular bit would be better due to it's beveled tip, but wouldn't cut like the Altis' method with the straight router bit.
As an aside and additional benefit of using inserts, those increasing ramp angles and shimming bindings can use machine screws instead of hard or impossible to find longer than 28mm alpine binding screws.Best regards, Terry
(Direct Contact is best vs PMs)
SlideWright.com
Ski, Snowboard & Tools, Wax and Wares
Repair, Waxing, Tuning, Mounting Tips & more
Add TGR handle to notes & paste 5% TGR Discount code during checkout: 1121TGR
-
12-11-2010, 07:12 PM #10
Still practicing being 24
- Join Date
- Oct 2008
- Location
- On another tangent.
- Posts
- 4,028
Well Altis, I may not be fast, but I sure am slow. Thanks for starting all this in 2006....
Finally, I got inserts in my Havocs to use either tele or Silvretta bindings:

The dowel jig is definitely a sweet, accurate and fast way to securely bang out truly vertical holes and taps with a hand drill. The brad tip worked better than the speed bit with punched plugs in binding holes. The speed bit took off fast (good thing I cranked down the stop collar the first try ), while the brad tip tracked in the punch hole and was easier to control.
The uniform depth of the bushing holders, seated on the ski surface allows you to set the stop collar depth and easily count on uniform drill depths at various locations on the ski.
Here's a few more shots to hopefully spark some other ideas on setting up doweling jigs or other fabrications:

Brad tip bit left, speed drill on right in 1/4" bushings.


Tap, drill and two sizes of bushings.

The bushing holders are 24mm, add the insert depth to this and lock the drill stop collar at this depth.

Shoulder screw and 3mm hex bit for installing inerts fast. Back out quickly so the insert doesn't back out as well.
Edit: added image of tele and Silvretta.Last edited by Alpinord; 12-12-2010 at 09:06 AM.
Best regards, Terry
(Direct Contact is best vs PMs)
SlideWright.com
Ski, Snowboard & Tools, Wax and Wares
Repair, Waxing, Tuning, Mounting Tips & more
Add TGR handle to notes & paste 5% TGR Discount code during checkout: 1121TGR


 Reply With Quote
Bookmarks