
In the Garage: How to Adjust MTB Shifting
Popular Stories


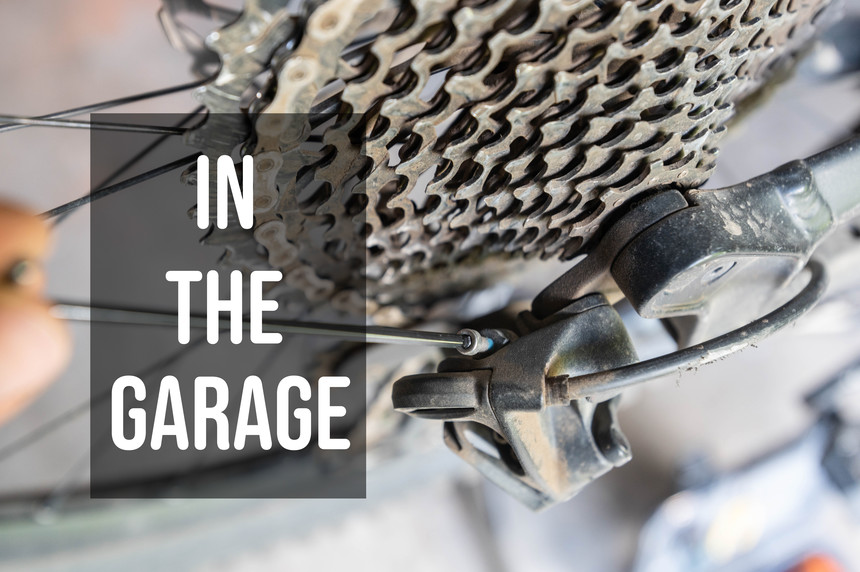 For Episode 4 of In The Garage, you'll learn that adjusting shifting isn't actually black magic. Max Ritter photo.
A noisy bike is a bike that isn’t performing as well as it could be, and you don’t have to be a World Cup racer to appreciate a bike that works. If you’re anything like me, hearing sounds that aren’t your hub or tires on dirt while you’re riding make you nervous. A common culprit is your drivetrain, and there’s a few reasons why your shifting might not be feeling as crisp as it did when your bike was brand new. Good thing is, it’s usually a simple fix.
For Episode 4 of In the Garage, I’ll walk you through how to set up the drivetrain on your mountain bike. You’ll need a few tools depending on what exact model of derailleur you own, including a small Philips head screwdriver, or an appropriately-sized allen key (2mm, 2.5mm, or 3mm keys are common).
Drivetrain Anatomy:
Before we begin, let’s make it clear what everything on that drivetrain is, and how it all works. By pushing the lever on your handlebar-mounted shifter, you are adding tension to a cable that runs to your derailleur, moving it and your chain up and down the cassette. On most modern drivetrains, adding tension brings your chain up the cassette into an easier gear.
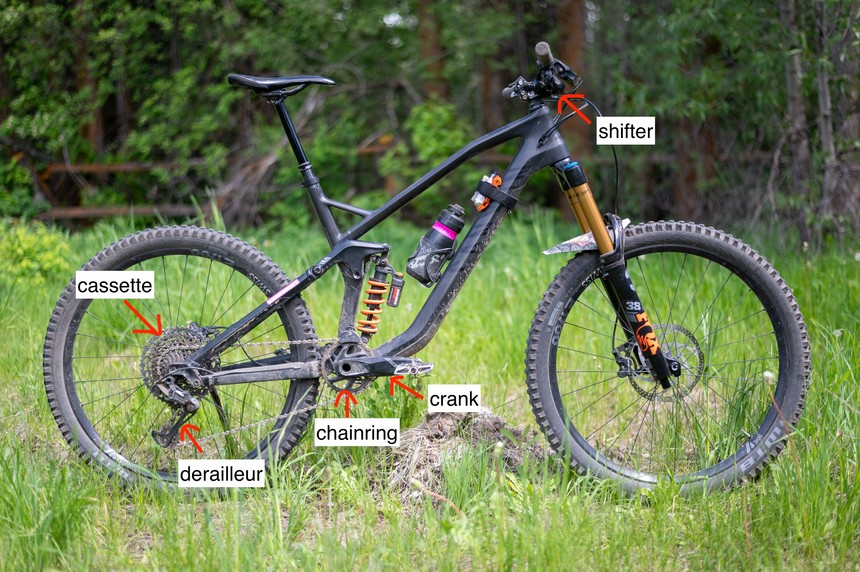 All those things on your bike have names! Max Ritter photo.
Derailleur: The derailleur is the device attached to the back of your frame that physically moves the chain over the cassette. It is made of an arm that holds two pulley wheels that guide your chain.
Derailleur Hanger: The derailleur hanger is the small piece of metal that attaches your derailleur to your frame. It is designed to break in a crash, sparing your frame or derailleur from damage.
Cranks: What turns the front chainring and transfers power from your legs to your bike as you pedal.
Chainring: The chainring at the front of your drivetrain, most 1x drivetrains use a special chainring with alternating narrow/wide teeth. Comes in different sizes.
Cassette: The set of cogs attached to your rear wheel that change the difficulty of pedaling.
Shifter: The unit attached to your handlebars that sets the tension of the shifter cable.
Cable and Housing: A shifting cable runs through rubberized housing along the length of your frame and adds or removes tension from the derailleur, telling it what position to be in.
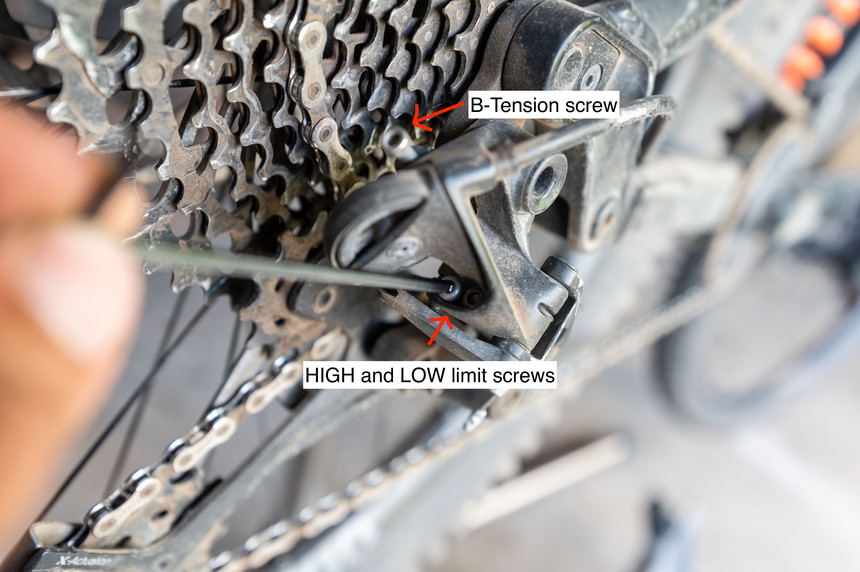
Limit screws: Your derailleur has a high and low limit to its range of motion, preventing the chain from moving too far up or down the cassette.
B-tension screw: B-tension adjusts the gap of your derailleur’s upper pulley wheel vertically from the cassette.
Barrel Adjuster: The barrel adjuster, typically found on your handlebar-mounted shifter, fine-tunes the tension of your shifter cable,
Identify the Problem
Where’s that sound coming from? As we talked about in episode 1, if you’ve been riding your bike for a while, it’s likely that you’ve lost some tension in your shifting cable, or your chain or cassette is starting to wear. Alternatively, a crash or improper storage might have bent your derailleur or hanger. So hop behind your bike and sight directly down the chain line to see how things are lining up.
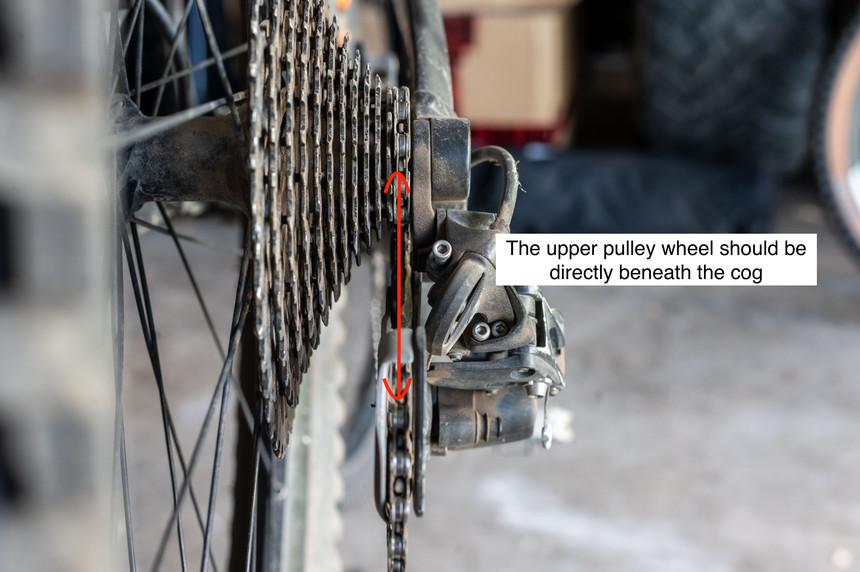
 Here, it's that the derailleur is slightly bent from my less-than-stellar riding, but the upper pulley still lines up for crisp shifting. Max Ritter photo.
Shift into a middle gear, and your upper pulley wheel should be in a perfect vertical line to whatever cog your chain is sitting on. If that’s not the case, use the barrel adjuster to add or remove tension to get it just right. We’re talking fractions of an inch here, but precision is key.
If this isn’t solving the problem, it might be time to start from scratch, so read on how to set it up fresh.
Sign Up for the TGR Gravity Check Newsletter Now
Set Up From Scratch
1. Complete release the tension in your shifter by turning the cranks and shifting into your hardest gear (smallest cog at the back). Then undo the bolt on your derailleur that’s holding the shifter cable in place so it can move freely.
2. Screw the barrel adjuster on your handlebar-mounted shifter all the way in, then back it out 1 full turn.
 The barrel adjuster on your shifter can be your best friend. Max Ritter photo.
3. Sighting your derailleur from the back, set your LOW limit. Identify which screw is which on your derailleur (they are typically labeled L and H). Turn the low limit screw in far enough that the upper pulley wheel sits directly below your smallest cog.
 Proper shifting is all about lining things up correctly. Max Ritter photo.
4. Pull the end of the shifter cable tight with your hand (just enough to take up any slack, but not so tight you are stretching it). While holding it tight, feed it through the clamp bolt and tighten the cable to the derailleur.
5. Turn the pedals and slowly shift all the way up the cassette into your easiest gear (biggest cog). Be careful, as the chain might jump over the biggest cog into your spokes, so the key is to shift slowly.
 The position of these screws varies depending on your derailleur brand, but they all function the same. Max Ritter photo.
6. Sighting your derailleur from the back, set your HIGH limit. Identify which screw is which on your derailleur (they are typically labeled L and H). Turn the high limit screw in far enough that the upper pulley wheel sits directly below your biggest cog.
7. Identify the B-tension screw on your derailleur, and crank it in or out to give a 3-5mm vertical gap between the biggest cog and the upper pulley wheel. Some derailleurs, including modern wide-range 12-speed units are particularly sensitive to this adjustment, so shift up and down while slightly turning the B-tension screw in or out to see what feels best. SRAM makes a tool for their Eagle derailleurs to properly set this adjustment.
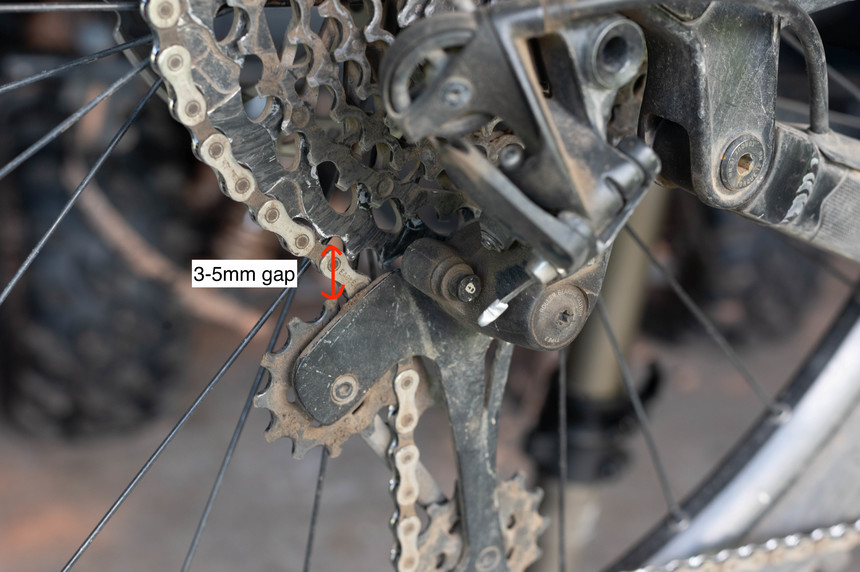 Measure that B-tension gap with your chain in the highest gear. Max Ritter photo.
8. Turn the cranks and shift and through your gears a few times to double-check that your indexing lines up, and use the barrel adjuster on your shifter to fine-tune cable tension.
9. Lube your chain, and go out and ride!