
Results 1 to 25 of 32
-
02-12-2014, 10:26 PM #1

 Registered Loser
- Join Date
- Jan 2008
- Location
- Jongistan
- Posts
- 5,313
MY botched mount (not a shop's) question, advice needed
So, decided this is the season to mount my own fucking skis. First pair (Elan Boomerangs w/PXs) went relatively smooth other than a very slightly inward toe piece on one binding.
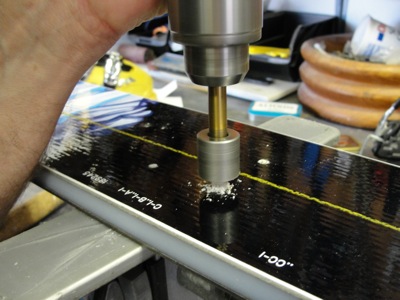
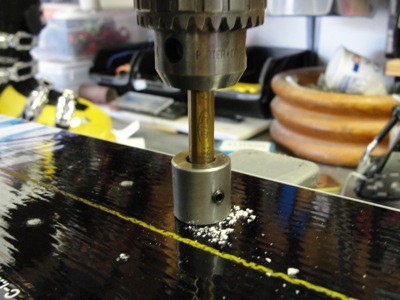
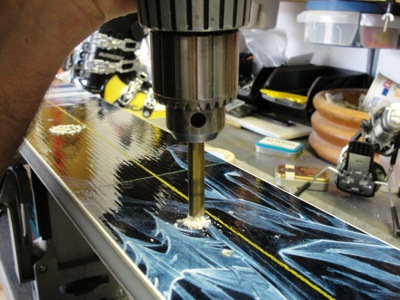
Next up is the new Praxis Piste Jibs with FKSs. Meticulously measured, marked, measured again, got it within 1/4mm, notched with knife, center punched and started drilling. Somehow, on one of the holes, I thought I got the bit into the punched hole. Nope, after drilling I realized I was quite a bit off (I'm using one of those guides that Terry sells that make the bit go straight, so it's hard to see).
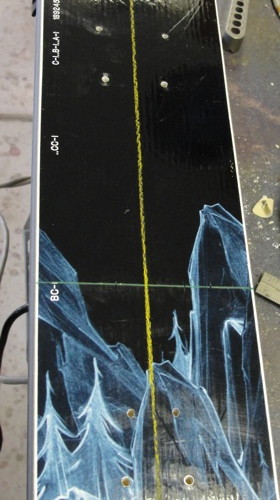
Anyway, threw a clamp on there just to see if maybe I got lucky and can make it work. Nope, no dice. Threw a set of calipers on it and from ~the center of the punched hole to ~the center of the incorrectly drilled hole is ~6mm.
WTF do I do? Yeah, Yeah I know search JONG, but I just found a shit ton of threads about shops botching a mount. Can I just epoxy the hole and redrill? Plug it and redrill? FWIW, I'm flying to Utah in 36 hours, am planning on bringing these and had hoped to get at least one day locally on them first. I have epoxy, but no plugs unless I can somehow pull one out of an old set of skis..
FML Originally Posted by Tunco perfectly summarizing TGR

-
02-12-2014, 10:34 PM #2
Registered Loser
- Join Date
- Jan 2008
- Location
- Jongistan
- Posts
- 5,313
Here is a picture. The hole in question is the upper right hand corner. Sorry, no time to PhotoShop to make it stand out more.
Originally Posted by Tunco perfectly summarizing TGR
-
02-12-2014, 10:58 PM #3
 Lackey
- Join Date
- Oct 2003
- Location
- Hunter Thompson described it as hell.
- Posts
- 2,642
Unless you have the tools/ability to heli-coil depending on how close the correct location is, go for Epoxy and wait as long as what you using recommends/you can wait and re-drill. Pulling a plug will likely destroy it and epoxy is probably a better long term solution. Measure twice, drill once.
Skiing, where my mind is even if my body isn't.
-
02-12-2014, 11:01 PM #4
Registered Loser
- Join Date
- Jan 2008
- Location
- Jongistan
- Posts
- 5,313
Dude, I spent fucking hours measuring, remeasuring, getting it perfect. Missed the punched hole by a few MM, thought I was in and bam, got fucked. Originally Posted by CaddyDaddy77
Originally Posted by Tunco perfectly summarizing TGR
-
02-12-2014, 11:06 PM #5
with stoopid
- Join Date
- Nov 2008
- Location
- everyday sunshine
- Posts
- 312
If you're 6mm off, you should be far enough away that the screw in the proper spot won't contact the bad hole.
fill the bad hole with an epoxy/sawdust or epoxy/steel wool mixture and drill the new one in the right spot.
If it looks the threads of the screw are going to hit the plug, either tap the new hole before installing, or install the screw while the epoxy plug is still a little soft.
Either way I would epoxy the new screw in place.
-
02-12-2014, 11:11 PM #6
Lackey
- Join Date
- Oct 2003
- Location
- Hunter Thompson described it as hell.
- Posts
- 2,642
Yeah, sounds like you did it all spot on, just not your night. Always good to have someone else look it over if anyone else is around just to double check your measurements. That top sheet wasn't doing you any favors either. I always double-up and just impact the top sheet, and line up the bindings sans screws, yes it takes longer, but if your off a hair it's a lot easier to see with the actual binding than just the screw holes on the top sheet.
Skiing, where my mind is even if my body isn't.
-
02-12-2014, 11:13 PM #7
 ?
?
- Join Date
- Dec 2002
- Location
- oregon
- Posts
- 2,870
Are you using that 25 dollar stepped drill bit guide from binding freedom? Originally Posted by dumpy
"These are crazy times Mr Hatter, crazy times. Crazy like Buddha! Muwahaha!"
-
02-12-2014, 11:20 PM #8
 Still practicing being 24
- Join Date
- Oct 2008
- Location
- On another tangent.
- Posts
- 3,855
Bummer dumpy. Sounds like the remedy is covered above and you'll be fine.
For the next one:

I like to mark holes with an awl and lay the bindings over marks to check hole alignment. If off I can 'move' the mark with the awl at an angle and then raise vertically. Recheck with bindings. Enlarge holes with a punch or the drill bit and tap with hammer. Lift the guide to verify that the tip of the drill bit is in fact in the marks. Drop guide and drill.
Drilling Skis to Mount Bindings
Best regards, Terry
(Direct Contact is best vs PMs)
SlideWright.com
Ski, Snowboard & Tools, Wax and Wares
Repair, Waxing, Tuning, Mounting Tips & more
Add TGR handle to notes & paste 5% TGR Discount code during checkout: 1121TGR
-
02-12-2014, 11:26 PM #9
Registered Loser
- Join Date
- Jan 2008
- Location
- Jongistan
- Posts
- 5,313
Nope, using the $17 one from SlideWright Originally Posted by char
Originally Posted by Tunco perfectly summarizing TGR
-
02-12-2014, 11:30 PM #10
Registered Loser
- Join Date
- Jan 2008
- Location
- Jongistan
- Posts
- 5,313
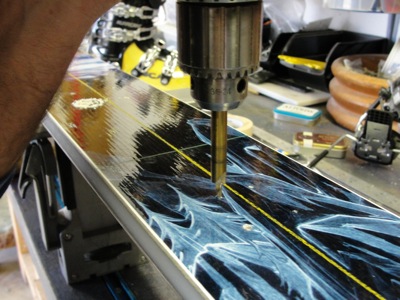
Not sure exactly what you're referring to with the top sheet, but I did notice that these top sheets are little harder and "stickier" than the last skis I did and the old boards I practiced on. For example, I use a stepped bit that on the other skis sort of started the counter sink process. Nada on these, perfectly flat until I hit it with a countersinking gizmo (forgot the name). Same thing with the center punch, it had at least 50% less impact per strik than on these than on other skis. Originally Posted by CaddyDaddy77
Originally Posted by Tunco perfectly summarizing TGR
-
02-12-2014, 11:33 PM #11
Registered Loser
- Join Date
- Jan 2008
- Location
- Jongistan
- Posts
- 5,313
Exactly what I did except for placing the binding on the ski. I think when I brought the bit and guide down, I just caught the top sheet was distracted by something else, thought I hit my punched spot and went for it. I even looked wiith the guide lifted (as shown above). Originally Posted by Alpinord
Well, live and learn. I learned to slow the fuck down. THanks for the advice everyone. Originally Posted by Tunco perfectly summarizing TGR
-
02-12-2014, 11:34 PM #12

 Registered User
- Join Date
- Dec 2008
- Posts
- 1,490
I feel your pain. I've measured four times before and still something shit the bed on me. As an aside note though, the three other holes look like you drilled through the top sheet. Is this ok? If I remember my days as a shop tech (15 years and a million beers ago, so I may not) I don't think we ever drilled through the top sheet. Just wondering. I agree that epoxy is probably your best bet. Those holes are gonna be right at the limit of how close they should be. Good luck man.
-
02-12-2014, 11:43 PM #13
Lackey
- Join Date
- Oct 2003
- Location
- Hunter Thompson described it as hell.
- Posts
- 2,642
Just that visually you don't have a horizontal reference point to give you a "oh shit" moment before you go full bore. I'm not recommending going off of ANY top sheet for reference points but a parallel line either vertical or horizontal can at least be a flag before you drill. Even with stamped center lines, etc, always measure to check. Top sheets definitely vary and can be soft, hard, slick and everything between and the difference between cores is huge, some feel like you need a new bit and the next pair punches through with no resistance. Originally Posted by dumpy
Skiing, where my mind is even if my body isn't.
-
02-12-2014, 11:46 PM #14
 Registered User
- Join Date
- Sep 2007
- Posts
- 3,429
Terry, Originally Posted by Alpinord
Are you drilling with the guide clamped to the ski or are you just holding it there?
Checking with the binding in place is a good idea. Last pair of skis I mounted, I didn't do that and one ski ended up ~1.5-2mm to one side. A friend mentioned that trick, and I did it this time. Moved holes slightly, then drilled and they are spot on.
Seth
-
02-12-2014, 11:51 PM #15
 Registered User
- Join Date
- Oct 2008
- Location
- Somewhere else
- Posts
- 5,693
FWIW, I never use a guide to get the hole perfectly vertical. I really don't think it matters within the tolerances of ski binding hole spacing.
If I were to repair that, I'd buy the hollow 5/16" bit from slidewright (which means you can drill somewhere other than the centre of the existing hole) and tap a nylon insert in there. I'd do that with a drill press, and not by hand.
My 0.02
Alpinord... can you comment on whether you'd recommend using regular wood glue or epoxy when installing a screw into a nylon insert?
http://www.slidewright.com/hollow-drill-bit.php
http://www.slidewright.com/nylon-tap...serts-20pk.phpGoal: ski in the 2018/19 season
-
02-13-2014, 12:08 AM #16
Registered Loser
- Join Date
- Jan 2008
- Location
- Jongistan
- Posts
- 5,313
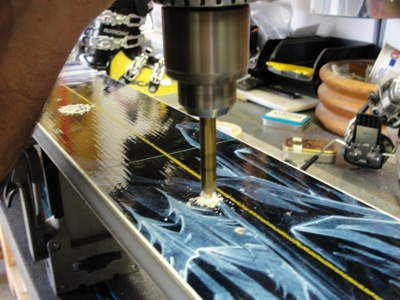
Yeah, I defintely had to drill through the topsheet a bit. Punching these didn't have nearly as much impact as I would've liked. Really it volcanoed the topsheet more than it punched through it. Really hard, but malleable, almost sticky (yet slick) and tough material. Originally Posted by DeepHelmet
As far as the pros and cons of drilling through the topsheet, I'm honestly too much of a jong at this to know, but everything I read said to punch, then drill.
Hole has been filled. Plan to drill and mount in the morning so I can maybe get a few afternoon or night turns in. Originally Posted by Tunco perfectly summarizing TGR
-
02-13-2014, 02:28 AM #17
Registered User
- Join Date
- Jan 2012
- Location
- Juneau
- Posts
- 1,100
So is the small dimple next to the botched hole where the hole should go? If so, I agree that you should be fine. Fill in the botched hole with epoxy and drill the correct hole. Originally Posted by dumpy
-
02-13-2014, 02:41 AM #18spook Guesthey that one looks a little off Originally Posted by dumpy
-
02-13-2014, 08:05 AM #19
 Registered User
- Join Date
- Feb 2008
- Location
- here and there
- Posts
- 18,593
Got any golf tees?
Sent from my Huawei-U8665 using TGR Forumswatch out for snakes
-
02-13-2014, 08:32 AM #20
Registered Loser
- Join Date
- Jan 2008
- Location
- Jongistan
- Posts
- 5,313
Yup, that's it. Center to center they are about 6mm off. If I were just eyeballing it, I would've thought they were closer, but my calipers consistently read just over 6mm. Originally Posted by dschane
Epoxy is probably cured enough to drill new hole, just gotta get my courage up now. Totally forgot about the golf tee trick, but yeah I gots tees.
Sent from my HTC6500LVW using TGR Forums Originally Posted by Tunco perfectly summarizing TGR
-
02-13-2014, 08:37 AM #21
Still practicing being 24
- Join Date
- Oct 2008
- Location
- On another tangent.
- Posts
- 3,855
Dumpy, if needed here is the Pivot/FKS template. Turn off classes for your BSL.
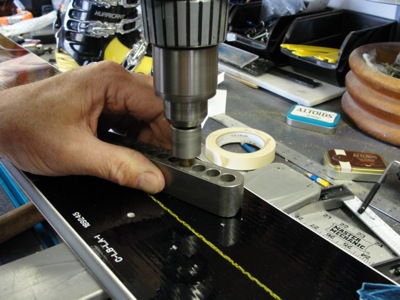
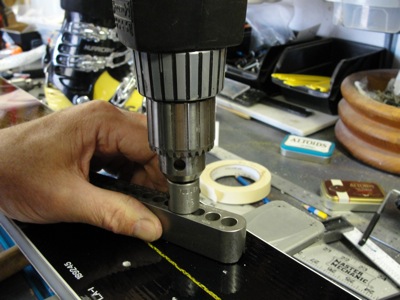
For binding screw mounts I freehand it or use a Jigarex. For inserts I use the guide freehand as shown below.
To answer a couple questions and clarify:
Practice on old skis or a board first.
Drilling Skis to Mount Bindings
April 26, 2012 • 2 Comments

Drilling your precious skis to mount your bindings is very straight forward and similar to drilling a multitude of materials like woods, plastics and composites.
Take your time, measure thrice and drill once. You’ll soon learn how easy and undaunted you will become.
If you haven’t done so, please also check out the following topics before proceeding:
-Finding Your Ski’s Centerline
-Paper Ski Binding Templates
-Drill and Tap Guides for Hand Drilling
After locating your binding template relative to the ski center line and boot sole center mark on the skis:

- Secure template with masking tape
- Mark small holes with a very sharp awl by hand at the hole locations
- Double check that hole marks are equidistant from centerline
- Measure with ruler, tape or calipers to assure they match the template
- Place the binding piece and visually make sure the marks align properly


If you find minor errors in your marks, you can use the awl tip to slightly ‘move’ the mark.
Once you are certain your hole layout is accurate, use a punch and hammer to enlarge the mark to provide a better guide for the drill bit tip.
 Relative to your experience level, confidence, required tolerances, drill and drill bit type, and other factors, the following hand drilling steps may be variable. Stainless steel inserts require a higher level of accuracy for location and vertical drilling than an alpine screw. If you have a drill press with a stop, you certainly don’t need a drill guide, but may consider using a drill bit stop collar on the bit. A stepped alpine drill bit ‘s shoulder may suffice for some as a reasonable ‘stop’ for drilling, but not others. A straight jobber, brad tipped or even stepped 1/4″ bits absolutely need a drill bit stop collar or certainty with a drill press stop.
The moment of truth, drilling the skis with a hand drill with various methods:
Drill Guide & Drill Bit Stop Collar:


- Set the depth of the drill bit stop collar to proper depth
- Locate the guide in the punched drill hole mark with the drill bit tip
- Clamp if desired or secure with a firm hand
- Turn on hand drill and to drill to the stop
- Turn off and pull out bit
- Repeat on the remaining holes
Drill Bit Stop Collar:


- Set the depth of the drill bit stop collar to proper depth
- Locate the drill bit in the punched drill hole mark
- Turn on hand drill and to drill to the stop
- Turn off and pull out bit
- Repeat on the remaining holes
Freehand Drilling with Stepped Drill Bit:


- Locate the drill bit in the punched drill hole mark
- Turn on hand drill and to drill to the shoulder (BE CAREFUL)
- Turn off and pull out bit
- Repeat on the remaining holes
Final Steps:
 Tap holes as necessary for top sheet type or stainless steel inserts:
Check drilled holes and vacuum drill dust:

 Add binding sealant/glue or epoxy as desired or recommended. Remove bubbles with toothpick and make sure perimeter and base of holes are coated:

Mount binding parts with proper screws and driver:
Make sure bindings are mounted flat to the ski surface with no gaps:

Visually inspect mounting of all binding parts and alignment:

Have boot fit, correct forward pressure and proper DIN set by authorized ski technician:

Last edited by Alpinord; 02-13-2014 at 12:40 PM. Reason: added template link
Best regards, Terry
(Direct Contact is best vs PMs)
SlideWright.com
Ski, Snowboard & Tools, Wax and Wares
Repair, Waxing, Tuning, Mounting Tips & more
Add TGR handle to notes & paste 5% TGR Discount code during checkout: 1121TGR
-
02-13-2014, 08:40 AM #22
Still practicing being 24
- Join Date
- Oct 2008
- Location
- On another tangent.
- Posts
- 3,855
Use the binding sealant for the nylon tap ins. It's not wood glue AFAIK, though it sure looks like it. Originally Posted by Shorty_J
Best regards, Terry
(Direct Contact is best vs PMs)
SlideWright.com
Ski, Snowboard & Tools, Wax and Wares
Repair, Waxing, Tuning, Mounting Tips & more
Add TGR handle to notes & paste 5% TGR Discount code during checkout: 1121TGR
-
02-13-2014, 10:48 AM #23
 Registered User
- Join Date
- Dec 2012
- Posts
- 17,757
+ on laying the binding over the holes, but I don't recommend an awl or anything real pointy--it creates too much volcano. Use a centerpunch instead--one that matches the dia of the bit. Awl point on left, centerpunch on right. Your bits won't wander. Originally Posted by Alpinord

-
02-13-2014, 11:53 AM #24
Banned
- Join Date
- Dec 2009
- Posts
- 7,167
jigs. they work. vibes.
rog
-
02-13-2014, 12:11 PM #25
Registered User
- Join Date
- Jan 2012
- Location
- Juneau
- Posts
- 1,100
It's tight and hard to be sure from the picture, but my money says if you're careful drilling that correct hole, you should be fine. Originally Posted by dumpy
Have you done the deed?

 Reply With Quote
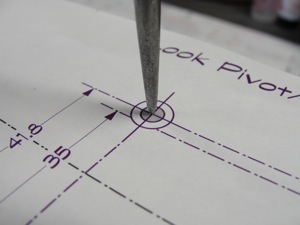


Bookmarks