
Results 776 to 800 of 876
Thread: Fritschi Vipec review thread
-
11-02-2020, 09:58 PM #776
 Registered User
- Join Date
- Nov 2013
- Posts
- 3
Appreciate it. PM sent. Originally Posted by Chugachjed

-
11-12-2020, 04:37 PM #777
 can fly!
- Join Date
- Jan 2004
- Location
- the Low Sierra
- Posts
- 17,820
a metric shit ton of info here
can anyone give me cliff's notes for mounting Tecton with Jigarex plates?I didn't believe in reincarnation when I was your age either.
-
11-15-2020, 12:22 PM #778
can fly!
- Join Date
- Jan 2004
- Location
- the Low Sierra
- Posts
- 17,820
Originally Posted by ~mikey b
I'm a noob with mounting tech bindings and JigarexI didn't believe in reincarnation when I was your age either.
-
11-20-2020, 04:50 PM #779

 music is the best
- Join Date
- Dec 2008
- Location
- Vacationland
- Posts
- 5,946
Feeler on a brake swap, have the 110 which will probably fit up to a 120 and want one for a 95 ish.
-
11-30-2020, 08:42 PM #780
Registered User
- Join Date
- Nov 2011
- Location
- Bay Area, Tahoe
- Posts
- 77
How far past stop is too far?
Is this too far past stop? How much damage to the binding could this do? Is this remount worthy? Am I gonna die?
I would prefer not to remount, but I don’t want to do any harm to the bindings or myself. Right now my plan is to ski/skin them very easy to test.
-
12-01-2020, 10:34 AM #781
Registered User
- Join Date
- Nov 2013
- Posts
- 1,109
Too much stress/ leverage on the mounting track that could result in it permanently deforming or breaking
Last edited by NorCalNomad; 12-01-2020 at 11:07 AM.
TLDR; Ski faster. Quit breathing. Don't crash.
-
12-01-2020, 11:25 AM #782
 ____________________
- Join Date
- Sep 2008
- Location
- Not Brooklyn
- Posts
- 8,358
You could get a demo track and possible reuse some holes: Originally Posted by chickenmonkey
https://www.telemark-pyrenees.com/fr...RoCa0AQAvD_BwE
Maybe someone here knows how the holes match up.
-
12-01-2020, 08:33 PM #783
Registered User
- Join Date
- Nov 2011
- Location
- Bay Area, Tahoe
- Posts
- 77
Thank you NCN and ISBD!
I’ll look into the demo tracks; that might be good anyway as I could see a different boot creating another problem in the future if BSL is even lower.
Anyone else have experience with this situation?
-
12-01-2020, 11:57 PM #784
 Registered & certifiable
- Join Date
- Dec 2014
- Location
- Colorado Front Range
- Posts
- 4,644
I bought a pair of Steeples last Spring with Vipec demo tracks. At most, you'll be able to reuse only two of your std. Vipec track's holes, and will have to drill 4 new holes. Originally Posted by chickenmonkey
Shown below, is the mounted demo track, along with the standard track beneath it (4 holes). The stop line on the demo tracks is puzzling. It makes no sense. The tip of the ski is at the left, so you'd expect the front (left) stop line to be further left, and the right (rear) one to be inline with the one on the standard track
Don't be a weenie. Suck it up, plug and drill . Post #409 in this thread is the Steeples (#408 is another project): https://www.tetongravity.com/forums/...10#post5931310

... ThomLast edited by galibier_numero_un; 12-02-2020 at 12:27 AM.
Galibier Designcrafting technology in service of music
-
12-02-2020, 07:09 AM #785
 Attitude of gratitude
- Join Date
- Sep 2010
- Location
- Wenatchee
- Posts
- 983
It should noted that the increased adjustment heel plate is great (and in many cases all that is needed) but fritschi does make a true demo plate which consists of a toe and heel plate, using same vipec mount pattern, and adjustable by hand with tabs. I sourced mine directly from black diamond via email. I can't find a link but I will post a picture.
Last edited by steveski; 12-02-2020 at 07:41 AM.
Common sense. So rare today in America it's almost like having a superpower.
-
12-02-2020, 07:41 AM #786
Attitude of gratitude
- Join Date
- Sep 2010
- Location
- Wenatchee
- Posts
- 983
Vipec demo tracks
Common sense. So rare today in America it's almost like having a superpower.
-
12-02-2020, 10:47 AM #787
Registered User
- Join Date
- Nov 2013
- Posts
- 1,109
+1 on epoxy and fg or cf. Slow setting epoxy is strong than your core anyways, hell wood glue is stronger in tension than almost all woods too. Glue any wood together and break them apart, will bet you $100 it won't be the glue failing. Originally Posted by galibier_numero_un
Thom the distance between the Stop lines is shrinking because you get more forward and after adjustment since the distance on the outside of the stop lines to the edge of the mounting plate is increasing. Or think about it as your heel piece centered on the plate is 0. With the regular plate you have "-15" forward and "+15" back. But with the demo plate it looks like (I forget the exact number) +60 and -60 from zero.TLDR; Ski faster. Quit breathing. Don't crash.
-
12-02-2020, 11:10 AM #788
Registered & certifiable
- Join Date
- Dec 2014
- Location
- Colorado Front Range
- Posts
- 4,644
If you look at the picture, the worm gear thread on the long tracks (not demo, I stand corrected - thanks, @steveski) is indeed longer, but the distance between the stop markings is shorter. It's the latter that puzzles me. Originally Posted by NorCalNomad
... ThomGalibier Designcrafting technology in service of music
-
12-02-2020, 12:03 PM #789
Registered User
- Join Date
- Nov 2013
- Posts
- 1,109
Sorry I really should just do a little drawing to explain this better. I'll update this in a few minutes
1. The distance BETWEEN the two marks doesn't really matter at all. We can forget about this.
2. The distance from the edge of the plate to the stop mark is actually what matters. That's the distance that is directly tied to forward and backwards adjustment amount. So the more distance between the edge of the plate and the stop mark means there is more adjustment.
***edit now have a visual***
3. I hesitate to even bring this up without a visual...but theoretically you could make the plate long enough that the marks would cross over each other. So then say the maximum backwards adjustment "Stop" mark would be the more forward on the plate than the max forward "stop" mark
***Now that I have a visual let me know if there is still a misunderstanding as there is one other way to explain it ***
***
Last edited by NorCalNomad; 12-02-2020 at 12:38 PM.
TLDR; Ski faster. Quit breathing. Don't crash.
-
12-02-2020, 01:24 PM #790
 Falling Down
- Join Date
- Dec 2004
- Location
- SoCal
- Posts
- 6,754
Assuming your photo is of the heel set to ski mode, I'd run it and not think twice. You're barely over the line. Originally Posted by chickenmonkey
How loose is the brake mount on the front of the track? It gets a bit looser when it overhangs. You could glue a shim (same height as track) under the front of the brake mount if you want to add some support.
-
12-02-2020, 01:42 PM #791
Attitude of gratitude
- Join Date
- Sep 2010
- Location
- Wenatchee
- Posts
- 983
^This. Originally Posted by 1000-oaks
I'm haphazardly skiing my xenics with about the same distance over the stop line. Slightly different mechanism between the two bindings but the heel track is exactly the same. No issues so far, but only two days of skiing.Common sense. So rare today in America it's almost like having a superpower.
-
12-02-2020, 04:08 PM #792
Registered User
- Join Date
- Oct 2017
- Posts
- 2,305
are you even over the line? Hard to tell from that angle.
I would ski em if you are on the line or pretty damn close to it. That gen Vipec does not have the issue of little overlap of the mounting plate vs heel unit in walking mode causing the internals of the heel to fill with snow either, so this mounting kinda seems like a non issue imho, even if you are what 6.25mm behind the line (so still pretty negliable).
If you do decide to remount the plate, then just move the heel plate back 1 to 1.5 cm or so and you are golden. It is about an easy re-mount as they come
-
12-02-2020, 09:27 PM #793
Registered User
- Join Date
- Nov 2011
- Location
- Bay Area, Tahoe
- Posts
- 77
Oh yeah, they are over the line by about 3 mm and in ski mode. That is with the gap behind the heal of the boot at around 2 mm of the recommended 1-2 mm. Originally Posted by kid-kapow
I will check the stability of the front overhang/break assembly and will contact BD about the full demo plates. That seems like a great approach anyway. I have not heard back yet from the shop with the heal only plates.
Great help everyone!
-
12-03-2020, 12:33 AM #794
Falling Down
- Join Date
- Dec 2004
- Location
- SoCal
- Posts
- 6,754
Isn't the recommended "gap" actually the boot almost touching the heel piece between the pins? (Virtually no gap at all.)
I didn't read all the posts, but why not just remount the heel plate further forward, rather than screwing around with demo plates?
-
12-03-2020, 03:30 AM #795
Registered & certifiable
- Join Date
- Dec 2014
- Location
- Colorado Front Range
- Posts
- 4,644
Yup - kiss gap, and yup, just remount. Originally Posted by 1000-oaks
I had to pull out the bloody binders and remove the brakes to make sense of what you said, but yeah. Originally Posted by NorCalNomad
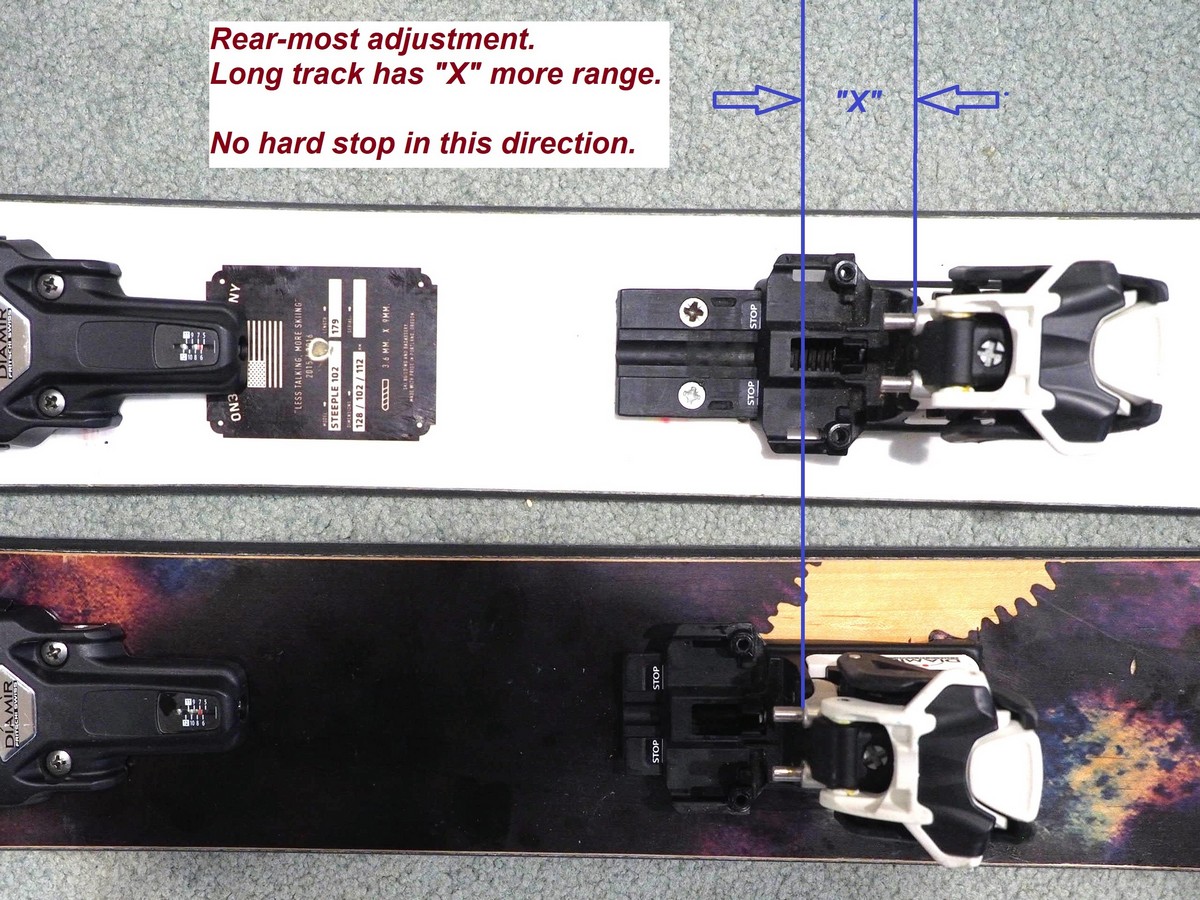
The first picture shows the "correct" fore/aft location of the two plates when mounted, and where I get wrapped around the axle - how I positioned the two plates in the post, above. The other point of confusion was which mark represents which limit. I keep reversing them (the rear mark is the forward stop and the front mark is the rear stop - simple, eh) In these photos, the Steeple has the long track and the GPO the short track.
I have no idea of the mounting standard / template that was used to mount the Steeples. I'm guessing that the real template would split the difference - extending the mount range equally in both directions, but I don't know.
Also, as mounted, and with both heels in their most forward position (shortest BSL), they differ by 2-3 mm. Conceptually however, this doesn't affect the analysis.
The key takeaway for me, is that if I ever move that long track heel plate, I'll do several test mounts to position them where it makes the most sense for the mount, missing existing holes, etc.
The other takeaway is that you can overshoot the rear max. point, because there's no hard stop in that direction. You'd have to pull the brake to see the stop line. Of course, one direction can't have a stop, otherwise you couldn't remove the heel piece from the track.


... ThomLast edited by galibier_numero_un; 12-03-2020 at 04:23 AM.
Galibier Designcrafting technology in service of music
-
12-03-2020, 09:51 PM #796
Registered User
- Join Date
- Nov 2013
- Posts
- 1,109
The gap that Fritischi asks for is 1mm from that little plastic nub between the pins to the rear tech insert on your boot. If you have it any closer you can damage those arms that hold on the pins. I bought a spare rear off someone who blew up their other and you can start to see damage to the arms. Originally Posted by 1000-oaks
Yeah galibier_numero_un since almost all my touring skis share my Vipecs and Tectons on inserts. Also I have two different sized BSL BC boots, so I've gotten REALLY familiar with the intricacies of mounting them (also always sans jig #papertemplategang") )
TLDR; Ski faster. Quit breathing. Don't crash.
)
TLDR; Ski faster. Quit breathing. Don't crash.
-
12-04-2020, 01:12 PM #797
Registered User
- Join Date
- Nov 2011
- Posts
- 2,480
No gap in vipecs, but no forward pressure either. For some reason the wildsnow pictures are gone https://www.wildsnow.com/11228/mount...ritschi-vipec/ but description
Using screw as illustrated, crank heel unit fore and aft till the small rectangular plastic area touches the boot heel. Thus, in static position the binding has no pre-loaded “forward pressure.” Once you start skiing, action of the ski flexing utilizes spring loaded heel unit.
Sent from my Pixel 3a using Tapatalk
-
12-06-2020, 08:16 PM #798
Registered User
- Join Date
- Dec 2020
- Posts
- 2
Adjust toe pin?
How hard it it to adjust the pins on these? I've lost my service manual, and can't find one online. Default width seems too tight for my boots.
-
12-06-2020, 10:15 PM #799
Registered User
- Join Date
- Nov 2013
- Posts
- 1,109
Super easy. And here is Fritchi's instruction url Originally Posted by Powderhound55
TLDR; Ski faster. Quit breathing. Don't crash.
-
12-12-2020, 12:13 AM #800
Registered User
- Join Date
- Dec 2020
- Posts
- 2
That "user manual" I have, I was hopping for a link to the the white "service manual" that came in the box with the bindings. It looks like there is thread lock on the pins, do people clean the current pin and reapply?
Sorry for all the questions; I'm just scared of breaking my brand new bindings before I even get to use them!

 Reply With Quote
Bookmarks