
Results 3,576 to 3,600 of 6863
-
03-02-2020, 07:18 PM #3576
 Registered User
- Join Date
- Nov 2016
- Posts
- 1,404
What's the recommendation for doing some major bending on brakes? I got some warden demos for a great deal on ebay but they're brake size wasn't listed. Looks like they're about 100mm wide. Do I have any shot of getting them on protests?
Sent from my Pixel 2 using Tapatalk
-
03-02-2020, 08:29 PM #3577
 Registered User
- Join Date
- Jan 2019
- Location
- Mid-tomahawk
- Posts
- 1,712
You can probably do it, but it might be easier to swap 'em on here. There's a healthy brake swap thread going. They're shared with STH2s and Guardians/Trackers as well, so there are a bazillion out there. Originally Posted by brundo

If you're in Seattle, I'd swap you for a pair of 130s.
-
03-02-2020, 08:41 PM #3578
Registered User
- Join Date
- Nov 2016
- Posts
- 1,404
Lucky day, I am in Seattle. Pm'd Originally Posted by HAB
Sent from my Pixel 2 using Tapatalk
-
03-02-2020, 11:40 PM #3579
 Registered User
- Join Date
- Oct 2008
- Location
- Somewhere else
- Posts
- 5,691
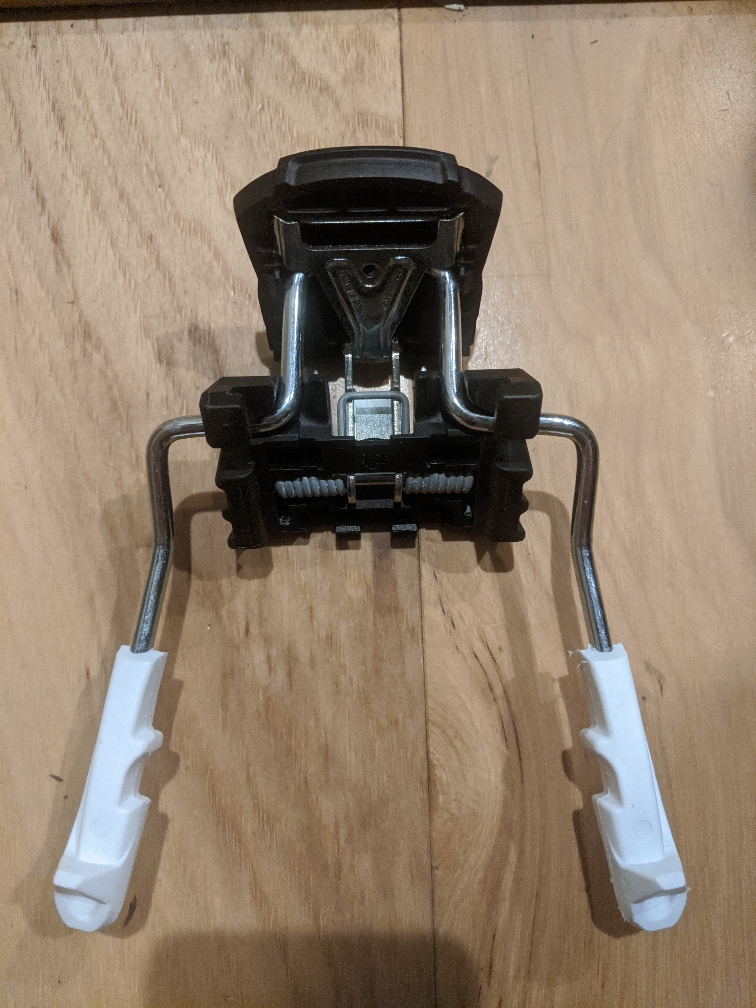
Can you post a pic of the brakes? Originally Posted by brundo
I bought some non-MNC warden demos and the brake assembly and brake arms are completely different from the usual kind and can't be swapped... it actually a single metal assembly.
The MNC may be different... not sure.
Sent from my SM-A505W using TapatalkGoal: ski in the 2018/19 season
-
03-03-2020, 12:05 AM #3580
Registered User
- Join Date
- Nov 2016
- Posts
- 1,404
Huh. I'm curious to hear if mine are the non-swappable kind as well Originally Posted by Shorty_J

Sent from my Pixel 2 using Tapatalk
-
03-03-2020, 01:37 AM #3581
 Registered User
- Join Date
- Jan 2013
- Location
- Bodenseekreis
- Posts
- 923
Those are swappable STH2, Warden, Guardian, etc.. But they look more 90 mm than 100 mm to me. Originally Posted by brundo
-
03-03-2020, 12:47 PM #3582

 Registered User
- Join Date
- Apr 2016
- Posts
- 143
I've only mounted alpine downhill bindings. Is there any difference in the process for tech bindings, specifically marker kingpins?
-
03-03-2020, 01:16 PM #3583
Registered User
- Join Date
- Mar 2008
- Location
- northern BC
- Posts
- 31,028
For a tech binding i have cut n paste the following a few times : Originally Posted by aguo5520
" You can use a template or not but first figure out where fore/aft to mount the heel and put it at dead center, then mount the toe dead center by ONE screw only, allow the toe to VERY slightly rotate around that 1 screw, mark/drill all the rest of the toe piece screws with the boot locked into ski mode and everything should line up perfectly
this will ^^ work for any frame type AT binding where you mount the heel and toe independently but they need to lineup/mesh
perfectly "
BUT the Kingpin is different than other tech bindings becuz it does not have pins at the heel,
BUT you would still need the boot to be centered
SO i think you want to do the same allowing the toe to rotate around 1 screw and have the heel comedown dead center before drilling the toe piece screwsLee Lau - xxx-er is the laziest Asian canuck I know
-
03-03-2020, 01:27 PM #3584
Registered User
- Join Date
- Oct 2008
- Location
- Somewhere else
- Posts
- 5,691
Agreed. Originally Posted by SoooL
This is what my weird non-MNC brakes look like. No idea why they would make this one different.
Sent from my SM-A505W using TapatalkGoal: ski in the 2018/19 season
-
03-04-2020, 08:44 AM #3585
Registered User
- Join Date
- Apr 2019
- Posts
- 72
I mounted up my own bindings for the first time last night - Here's a report on my experience.
Skis are K2 Wayback 96 184cm and bindings are ATK FR14. The bindings had been mounted on a different set of skis but I reconfigured my quiver to have a light touring ski and a heavier touring/travel ski.
I took the ATK paper template and converted it into a set of 3d printed drill guides. Accuracy of this particular printer is very strong so I had no concerns about that. The guides were designed to have all the info in the paper template - cross lines for the toe and heel, center points and directional markers.
After I received the skis I realized that they had these raised edges marking the titanal mounting plate - some checks with the calipers confirmed they were symmetric about the center. I designed some channels on the underside of the guides to have them lock in to the mounting ridges.
Now let me stop and mention that this is all WAY OVERKILL! I just had the ability and the tools and decided to try it this way.
With my custom made jigs and tools in hand I set out to do the mount. I taped up the skis longitudinally and marked the center with the guides - then I checked the center with the paper fold method in a few spots and confirmed I was where I needed to be.
I marked the manufacturers suggested mount point and then measured out +2cm for my mount point. Using the boot and its center mark to get the distance to the toe pins, I set my cross line for the toe piece (tape across the ski) - At this point I transitioned to the ski vise and got my tools together for the mount. Checklist: Drill, bit (4.1x9), tap, quick grips, bindings and screws, glue, pz3 driver, beer.
Set up the jig on the center line with the transverse points on the toe pin line. Clamped in place with a quick grip and drilled the holes. Not much to say there except that the jigs worked good. I'd put a metal insert in the guide holes if I was doing more than 1 pair of skis. Tapped and cleared the holes of debris, glue and screw the toe piece.
With the toe piece in place I mounted up the boot - checked the heel center against the center line at the rear and taped the rear transverse line.
Repeat the front steps with the rear jig - points for center and transverse lines came in handy again.
On initial pass I didn't tighten the heel enough on the fist ski and then as I was checking I noticed it wasn't all the way down. Rookie mistake and easily fixed.
Here's a picture of the final product, time to go ski on them!
-
03-04-2020, 02:31 PM #3586
Registered User
- Join Date
- Jan 2011
- Location
- Calgary, Alberta
- Posts
- 362
Those ATKs are sexy bindings. Cool idea with the 3d printed guide!
-
03-04-2020, 02:40 PM #3587
Registered User
- Join Date
- Nov 2018
- Posts
- 758
Definitely overkill but well done!
Sent from my iPhone using Tapatalk
-
03-04-2020, 05:16 PM #3588
Registered User
- Join Date
- Apr 2019
- Posts
- 72
My plan in the future is to decouple the guides and the drilling process. The guides were super useful for setting up the toe position and getting the holes all in the right spot relative to each other, but after one ski I knew that you didn't need the guide to drill the holes at all.
The next version will just be a plate, with the centerline pointers with the holes set for the centerpunch size. Might work on a self centering design for the plate to work on any ski. Will be much cheaper and faster to print.Last edited by IanCH; 03-04-2020 at 08:32 PM.
-
03-04-2020, 09:53 PM #3589
AF
- Join Date
- Jul 2008
- Location
- Sandy by the front
- Posts
- 2,345
14th pair of Moments in the family, (wife, sons, DIL's granddaughter etc) maybe I need counseling? These are my new groomer skis to go along with the Deathwish and Deathwish tour.
-
03-05-2020, 03:27 PM #3590
Minion
- Join Date
- Mar 2020
- Posts
- 1
Adjusting Marker iPT Lowride binding (Volkl Deacon 80)
I just got a new skis delivered and it seems the Marker bindings are different from ones I have used in the past. Since I can't seem to find instructions online for these bindings, I would appreciate any help.
No front screw: My understanding is that since they are "grip walk" bindings there is no way to adjust the friction plate. Is this true? Am I just not seeing it?
No back screw: Instead there is a hex key. It seems that when I turn the hex key it does not loosen/tighten the binding, but instead moves the latch which can be used to slide the back binding forward and backward.
The DIN is currently set to the correct value.
Thank you!
-
03-06-2020, 08:02 AM #3591
Registered User
- Join Date
- Dec 2009
- Location
- Sun Valley, ID
- Posts
- 2,546
I’d take a set of next gen fr14 Mount guides.... Originally Posted by IanCH

-
03-06-2020, 08:28 AM #3592
 Detrusor
- Join Date
- Jan 2009
- Location
- Park City
- Posts
- 5,019
It’s because they’re demo bindings Originally Posted by Shorty_J
Sent from my iPhone using TGR ForumsI rip the groomed on tele gear
-
03-06-2020, 08:39 AM #3593
 Registered User
- Join Date
- May 2016
- Posts
- 2,549
Telemark mount point? I googled and found these long philosophical essays. I have plastic boots. 75mm bindings. Old volkl gotama skis.
Just try to line up the mark on the boot to centerline? If a hole conflict go a little forward or back?
Sent from my SM-G960U1 using TapatalkI <heart> hot tele-moms
-
03-06-2020, 01:24 PM #3594
 Sure, why not?
- Join Date
- Apr 2012
- Location
- ¯\_(ツ)_/¯
- Posts
- 11,748
Most people mount tele on the rec line these days. Historically it has been more rearward. So maybe move back if necessary. As always with mounts YMMV.
-
03-06-2020, 01:41 PM #3595
Registered User
- Join Date
- Mar 2008
- Location
- northern BC
- Posts
- 31,028
Some Boots didnt always have a boot center mark so I would measure/mark half way between front of & back of boot shell call that boot ceneter
Put that boot center mark at ski center
its lelemark so it will either be better or worse
or bothLee Lau - xxx-er is the laziest Asian canuck I know
-
03-07-2020, 08:06 AM #3596
 Registered User
- Join Date
- Mar 2009
- Posts
- 3,064
Don't buy into tele mount voodoo! Mount that shit as normal.
BD was the only manufacturer to put a bc mark on 75mm boots(that I recall). 75mm boots you have to measure from PIN LINE to heel, not boot toe.
-
03-07-2020, 08:43 AM #3597
Registered User
- Join Date
- Apr 2019
- Posts
- 72
Maybe I'm misunderstanding you but ... Whether you are mounting alpine bindings or pin bindings the boot center is the same... Originally Posted by tuco
Sent from my SM-N975U using Tapatalk
-
03-07-2020, 09:09 AM #3598
 Registered User
- Join Date
- Jun 2005
- Location
- Driving2VT
- Posts
- 4,598
He is talking pin line on a telemark boot Originally Posted by IanCH
Uno mas
-
03-07-2020, 09:37 AM #3599
Registered User
- Join Date
- Apr 2019
- Posts
- 72
Gotcha my mistake haha Originally Posted by Doremite
Sent from my SM-N975U using Tapatalk
-
03-07-2020, 09:44 AM #3600
Registered User
- Join Date
- Mar 2009
- Posts
- 3,064
Yep, talkin 75mm telemark boots in particular Originally Posted by IanCH

 Reply With Quote
Bookmarks