
Results 401 to 425 of 601
-
12-29-2019, 03:11 PM #401

 Registered & certifiable
- Join Date
- Dec 2014
- Location
- Colorado Front Range
- Posts
- 4,644
^^^ this ^^^
G-flex 650 and Bob's your uncle. It's not as if ordering from Amazon is complicated.
... ThomGalibier Designcrafting technology in service of music
-
12-29-2019, 06:09 PM #402
 Registered User
- Join Date
- Sep 2015
- Posts
- 164
Damn, well thanks man for letting me know. So if I already did one pair of skis is there anything I can do or just keep an eye on them and redo it if they come loose? I leave Tuesday to head out west which is why I didn't have time to order something online. Originally Posted by margotron

-
12-29-2019, 07:00 PM #403
 Registered User
- Join Date
- Oct 2014
- Location
- Tahoe>Missoula>Fort Collins
- Posts
- 1,798
I mean, we plan trips to ski, right?!
My advice is to roll to the store and find another slow set epoxy (gorilla glue epoxy is good for store quality. Ace, Lowe’s, Home Depot). You’ll be fine for this trip. I’d recommend redoing the JB weld set after the trip. Until then send it till you bend it!
Sent from my iPhone using TGR Forums
-
12-29-2019, 07:16 PM #404
Registered User
- Join Date
- Sep 2015
- Posts
- 164
It's an 8 week trip so I'm wondering how long I'll get out of the JB weld ones. My main reason for inserts is that I had my ankle fused so I'll be experimenting with various shims under my toe bindings trying to dial in my binding delta that gives best fore/aft balance. So I could be removing the toe pieces several times the first day when I get out there. If it's likely I'm going to get a spinner that could screw up my day then I should probably fix these tomorrow. I mean, is it pretty much a given that the JB weld ones will fail? West Marine sells G Flex so I could get some in store tomorrow (and pay twice what Amazon sells it for) or I'll likely get several days out of the JB weld ones I can order G Flex and have it sent to Denver so it's there when I arrive. Originally Posted by margotron
-Would I just heat up the JB weld ones with a soldering iron and back them out?
-Reading some posts here I read about people counting the amount of turns with the tap. I bought the drill bit from Binding Freedom and it is stepped so wouldn't that give me the right depth if I go to the step? When I test fitted the inserts they'd go another 2mm below flush but when I installed them I put in a decent amount of epoxy and then just installed them until they were flush but they aren't bottomed out.
-Do you want to smear the G Flex on all of the skis threads prior to installing the inserts?
Man, I wish I found this thread before I went for the install but I just went by the instructions on the BF website and it doesn't say much about type of epoxy, insert depth, etc. It all went so smoothly that I thought I had it dialed but then started wondering if JB Weld was a mistake which led me here.
Thanks for the help!
-
12-29-2019, 10:07 PM #405
Registered & certifiable
- Join Date
- Dec 2014
- Location
- Colorado Front Range
- Posts
- 4,644
The JB Weld could last forever ... or not. Since you'll be removing toes periodically, you'll have an opportunity to inspect them. I seriously doubt you'll develop spinners, but micro cracks could potentially result in some seepage into the core (also unlikely).
Did you degrease the inserts before installing them? I use my wife's ultrasonic jewelry cleaner with some Simple Green. Others use something like acetone (not in an ultrasonic cleaner).
... ThomGalibier Designcrafting technology in service of music
-
12-29-2019, 10:25 PM #406
 Falling Down
- Join Date
- Dec 2004
- Location
- SoCal
- Posts
- 6,753
Been using denatured alcohol the last couple years. Have a few olive jars of it in various degrees of contamination, and do cascade baths from dirtiest to cleanest, followed by a final bath of virgin alcohol. Get aluminum pie pans and a cheap screen collandar so you can shake them mostly dry. Pinch a spout on the edge of each pan to make it easy to pour back in the jar.
-
12-30-2019, 07:09 AM #407
Registered User
- Join Date
- Sep 2015
- Posts
- 164
Originally Posted by galibier_numero_un
Yes, degreased with mineral spirits and alcohol. I think I'll pull the bindings today to see if I suspect any slippage.
-
03-19-2020, 02:19 PM #408
Registered & certifiable
- Join Date
- Dec 2014
- Location
- Colorado Front Range
- Posts
- 4,644
Too much time with a knee that's healing at the moment, so here's a completed project. Technically, this isn't a Swiss Cheese ski, but it is appropriate to concerns people have about hole proximity.
Disclaimer: I don't drop cliffs, I weigh 165# and ski slowly by the standards that most maggots claim to ski. If we weren't in Corona lockdown, I'd hit the lifts to hammer on the bindings for a day, but as is, I'll remove and inspect after the first day or two out on them. With that ...
A pair of skis came my way with inserts for a Hammerhead mount, and as luck would have it, hole interference meant a 1.5-1.75 movement from recommended, which I refuse to do. I started by removing the inserts and plugging them with a putty made of chopped up fiberglass and epoxy (G-Flex 650 - of course).
One key problem when you're drilling at the border of hole plugs is the bit wandering. If you're confident with a drill press, you can control this, but I've never tried using one as the setup would try my patience: controlling bit depth for each hole (since the top isn't parallel to the base), as well drilling perpendicular to the ski for the same reason.
So, I adopted the following technique. I made an error on one hole. I'll describe the recovery at the end.
Key Assumptions:
- You'll be installing inserts to strengthen the mount. Inserts require a 5/16" drill bit / hole.
- The through-holes in your binding are less than or equal to 5/16" in diameter (very likely)
- This is a tech mount where heel pin alignment is critical. Adjust your technique as appropriate for non pin bindings.
Method:
1. Drill one of the binding holes where drill bit wandering is unlikely - a hole that doesn't overlap an old hole.
2.Install the insert & screw the binding in place by that single screw.
Note: Drilling the second hole requires holding the binding in position.
- If this is a toe piece mount, follow xxx-er's advice of inserting the boot to align the toe so the heel insert aligns with the heel pins.
- If it's a heel mount, you'll need to use a combination of tightly screwing down the single screw and holding the binding in place with your hand. This can get a bit tricky with heel pieces. Ideally, you'll be able to drill two holes the "normal" way before addressing the hole adjacent to the plug.
3. Find a drill bit that most closely fits the binding's through-hole (not a screw bit hole diameter).Warning: if the bit is larger diameter than the drill bit for inserts, STOP. You'll need to use another method. I have not seen this to be the case so far.
4. Drill the hole as follows: with the binding held firmly in place, select a drill bit that barely passes through the binding hole. The binding will serve to keep the drill bit aligned. Drill about 1/4" to 5/16" deep. Don't drill through the ski, and see below about not drilling deeply enough.
5.Remove the binding and using the insert bit, drill the wider hole to the correct depth.
6. Tap the hole and install the insert.
Where I screwed up:
I got 3 of the 4 holes right. For the 4th one, I removed the toepiece and saw that the hole was only about 1/16" deep. Better to be overcautious and not drill through the ski, but in this case, the hole was far to shallow. When I drilled the wider hole, the bit wandered into the plugged area (oval hole).
I should have screwed the binding in and repeated the process of drilling the hole deeper before drilling "freehand".
So, I re-plugged the hole and repeated the above process which worked nicely. The following 3 photos show the recovery:
The re-plugging operation:

After Dremeling off the excess and drilling and tapping:

The installed insert:
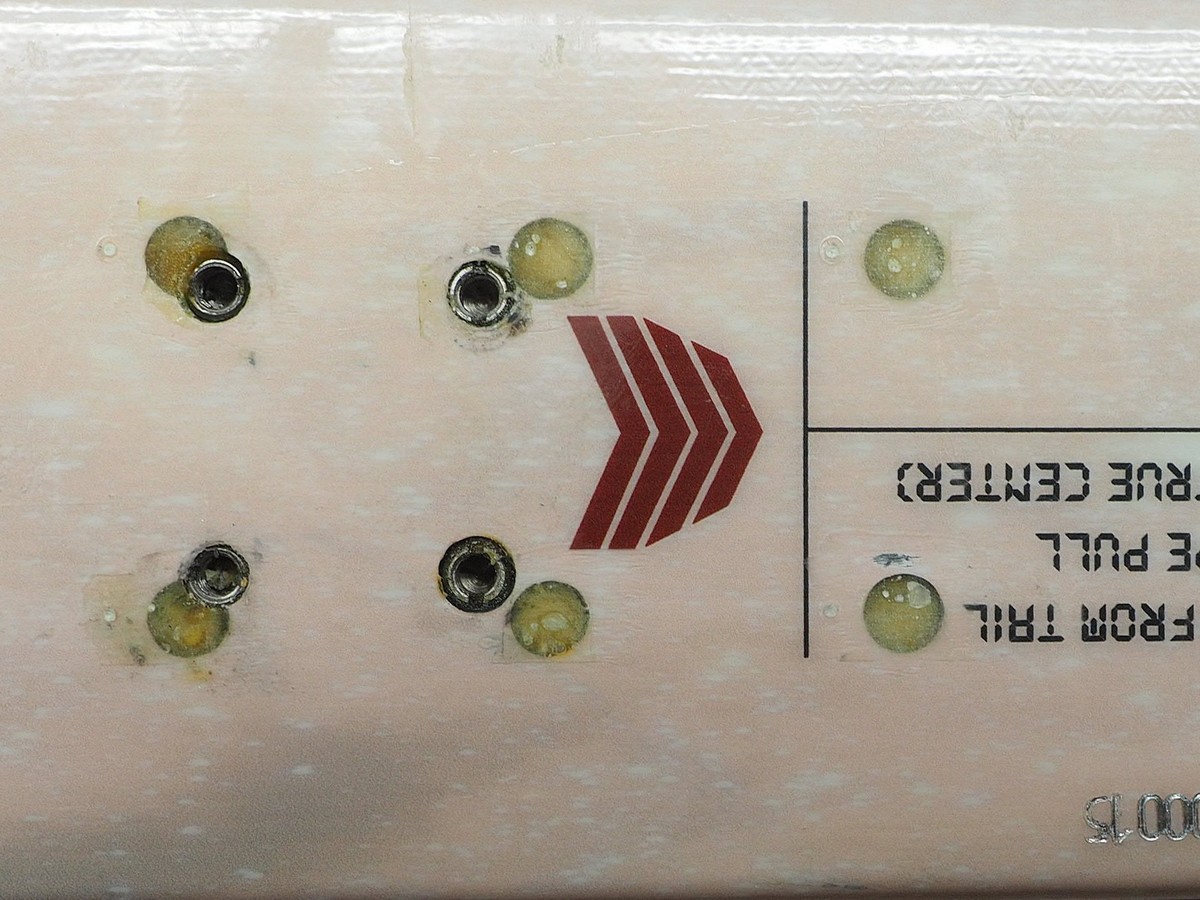
Last edited by galibier_numero_un; 03-19-2020 at 08:24 PM.
Galibier Designcrafting technology in service of music
-
03-19-2020, 04:22 PM #409
Registered & certifiable
- Join Date
- Dec 2014
- Location
- Colorado Front Range
- Posts
- 4,644
Oh ... and for a "proper" Swiss Cheese mount, here's a pair of Steeples I picked up. 17 unused holes. The skis arrived with normal ski plugs, but I'm of the habit of pulling them to inspect for core rot - after which, I re-plug with fiberglass and G-flex 650 epoxy.
Nursing my gimpy knee has opened up my schedule to get this stuff done.
...Thom
 Galibier Designcrafting technology in service of music
-
03-19-2020, 04:46 PM #410
 Registered User
- Join Date
- Oct 2014
- Posts
- 258
Stoked that you were able to get those demo tracks off. I presume the core was in good shape then?
Good info in post #408 as I will probably have to drill over existing toe holes to mount inserts in my replacement steeples - the existing holes being regular screw holes. Not exactly the same situation, but basically the new insert holes will encompass the old standard screw holes but will not be centered on the same point.
-
03-19-2020, 05:30 PM #411
Registered & certifiable
- Join Date
- Dec 2014
- Location
- Colorado Front Range
- Posts
- 4,644
Yeah, same issue (wandering bit). Originally Posted by nwslider
The core on those Steeples was in awesome shape! Those skis are beasts (going from my memory of a demo - now I gotta get out on them). evo.com's archive page had the 179s at 1920g which surprised me (one can dream), but they came in at 2110g which is more consistent with ON3P.
Man! I couldn't believe how much heat I had to apply to break the epoxy loose to remove the screws on the heel tracks (about 25 seconds instead of the "usual" 12-15). I don't know how you got 3 of those screws loose without heat.
Now, all I need to do is to get out on them. The 100-ish quiver is coming together (burly ass Steeples, and some 1550g Down CD 104s).
... ThomLast edited by galibier_numero_un; 03-19-2020 at 10:27 PM.
Galibier Designcrafting technology in service of music
-
03-20-2020, 09:26 AM #412
 Registered User
- Join Date
- Mar 2014
- Location
- 7B Selkirks USA
- Posts
- 923
Tell us how you got the inserts out. A lot of heat and patience I am sure. But what else? Originally Posted by galibier_numero_un
And, nice job saving those steeples for another decade of use!
-
03-20-2020, 09:48 AM #413
Registered & certifiable
- Join Date
- Dec 2014
- Location
- Colorado Front Range
- Posts
- 4,644
Actually, we were talking about well epoxied conventional screws, but I did start thread on using an ez-out (screw extractor) to remove inserts. I'll dig the link up when I get to my laptop. Originally Posted by Kootenai
[Edit] found it: https://www.tetongravity.com/forums/...d.php?t=331826
... ThomGalibier Designcrafting technology in service of music
-
03-20-2020, 10:37 AM #414
 I love beer
- Join Date
- Aug 2005
- Location
- New Mexico
- Posts
- 1,465
Review: Binding Freedom Inserts - The Swiss Cheese Experiment
I was literally just looking for this, Thom you are the man, thanks!
Fear, Doubt, Disbelief, you have to let it all go. Free your mind!
-
03-20-2020, 10:53 AM #415
I love beer
- Join Date
- Aug 2005
- Location
- New Mexico
- Posts
- 1,465
Review: Binding Freedom Inserts - The Swiss Cheese Experiment
Where are folks finding the wooden dowels to fill holes? I’m assuming hardwood dowels epoxied in would be the best option when planning to drill into a partially filled holed?
Fear, Doubt, Disbelief, you have to let it all go. Free your mind!
-
03-20-2020, 10:59 AM #416
Registered User
- Join Date
- Nov 2018
- Posts
- 757
I use bamboo skewers from amazon. I think they are either 3mm or 4mm in diameter and fit quite nicely into the holes Originally Posted by eskido
Sent from my iPhone using Tapatalk
-
03-20-2020, 12:30 PM #417
I love beer
- Join Date
- Aug 2005
- Location
- New Mexico
- Posts
- 1,465
Review: Binding Freedom Inserts - The Swiss Cheese Experiment
Thanks!
Fear, Doubt, Disbelief, you have to let it all go. Free your mind!
-
04-25-2020, 06:35 AM #418
Registered User
- Join Date
- Apr 2020
- Posts
- 21
I have a bunch of inserts that have gone in to and come out of different skis. From what I can tell now the threads are a bit dirty. There is different residue stuck in the threads. I tried boiling them and then flush them with water but that didnt seem to loosen it up. To scrape it all out feels that I might damage the threads just as much as the residue ruins them.
Do you have any tips on chemicals that work?
-
04-25-2020, 07:41 AM #419
Registered User
- Join Date
- Apr 2017
- Location
- Encinitas CA
- Posts
- 277
Use acetone. Cut an aluminum beer can in two, put the inserts in and cover with acetone. Let them set for several hours or even overnight and then wipe them off with a shop rag. Originally Posted by Pillard
Sent from my iPhone using Tapatalk
-
04-25-2020, 07:53 AM #420
 Registered User
- Join Date
- Mar 2009
- Posts
- 3,064
Yep. Put plastic film over container too, so acetone does not evaporate.
Paint stripper will also soften cured epoxy.
-
04-25-2020, 08:44 AM #421
Registered User
- Join Date
- Apr 2020
- Posts
- 21
Great! Does a Coke can work just as well?

-
04-25-2020, 09:52 AM #422
Registered User
- Join Date
- Jul 2005
- Posts
- 3,230
Yes. If it’s red.
Sent from my iPhone using Tapatalk
-
04-25-2020, 10:16 AM #423
 Registered User
- Join Date
- Apr 2012
- Location
- G Falls
- Posts
- 400
If there is epoxy on the treads is the insert, I’ve had good luck putting a m5 screw into the insert, chuck the screw into a drill and spin the insert while holding a wire brush against it. Cleans them off in no time. I always soak them in acetone after doing this just to be sure and always handle them with nitrile gloves on after the acetone to make sure and keep my greasy fingers off the insert. All this might be overkill but I’ve never had one fail.
-
04-25-2020, 10:35 AM #424
Registered User
- Join Date
- Apr 2017
- Location
- Encinitas CA
- Posts
- 277
Good point Originally Posted by tuco
Sent from my iPhone using Tapatalk
-
04-25-2020, 11:24 AM #425
Registered User
- Join Date
- Mar 2009
- Posts
- 3,064
Anyone tried running insert through a die?

 Reply With Quote

Bookmarks