Author’s note: As a journalist, I feel I need to be transparent about my credibility. I don’t want to give the impression that I’m good at making surfboards. If you’re looking for a serious how-to on shaping and glassing, visit Surfer Steve (surfersteve.com). What I can provide is the experience of someone who’s almost made three boards. Two of these boards surf without going in circles. The third might surf if the smoldering chemical fire in this shitty trailer does not spread.
Shaping surfboards is a special activity. Unlike the construction of so much of our gear, giving birth to one of those shiny obelisks of foam and fiberglass is very attainable—even for dirtbags. The materials are relatively straightforward. The tools are rudimentary. The feeling that comes with riding your own board—one you’ve sweated over or been burned over—is complex and enthralling.
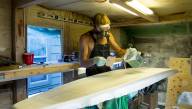
 The old shaping shack/nightmare carnie hangout.
Though I’ve surfed since I was a kid, I probably would have never gotten into shaping if it wasn’t for my friend Jacob and a $300 trailer. Jacob hollowed out this ugly thing and fixed it with lights, stands and a slough of chemicals. He learned to shape from an old man in Portugal and is quite good at it. I initially learned from him and I’m still learning.
SHAPING
Shaping is an art that takes years to master. Dirtbags probably won’t carve Greg Noll’s gun the first time around. Shoot for making a functional surfboard for the type of waves that you like to surf. Funboards, longboards and single-fin shortboards are all basic and easy shapes. Blanks come in rough cuts of all these and more.
I started with the goal of fashioning a retro single-fin shortboard. Without any research or an outline, my first shaping experience went marginally. At 2.5 inches or more, the board was too thick and floated like a balloon. The rails were not well rounded and one side of the shape had a bit of a flat spot. Still, when I surfed it in a gangly waste-high swell in Half Moon Bay, it performed tolerably.
The basic process for shaping is relatively simple. Draw an outline, copy it symmetrically onto the blank, do a rough cut with a handsaw, plane and shape accordingly. Finish with the rails. A common error is to overcorrect repeatedly and end up with a sheet of foam paper. It’s not difficult to do the opposite either, by skimming too little.
 A rough cut of the author's blank.
GLASSING
If shaping is an art, glassing is anguish— with some reward. Fiberglass is a malicious material that, until tamed, will try to kill you. If it weren’t, I wouldn’t be looking for a fire extinguisher.
My second board, also a short single-fin, came out leaps and bounds better than my first. The shape is on point and designed more aggressively. I decided to try the cutlap method of glassing. I used a pigment to create a green and yellow swirly on the bottom. The top is clear and uniform. There are a few minor blemishes in the glass. But I got lucky on this one.
The third board—an 8’ 6” longboard—is where glassing shook me like a robbery. Everything started out okay. I cut the fiberglass fabric into a smooth shroud around the edges of the foam. I grabbed a brand new measuring cup and poured the resin. I calculated the amount of hardener, dropping it into the small bucket. This is where things went wrong.
Online, it’s easy to find videos of pro shapers swishing colorful resin patterns over sparkling boards. Their wrists flip the liquid around, easily laminating the wrinkle-free fabric. Within minutes, they’re done and perfection sits drying on a rack. Dirtbags, don’t fool yourselves.
I poured the resin, flipped the puddle around and realized I was dealing with Jello. The resin had gelled in moments. Clearly, a miscalculation was made. When resin hardens too quickly, it heats up. And when it heats up quickly in a large, contained volume it can actually catch fire—chemical fire.
I tore the fiberglass cloth off, half-quart of mixed resin and all, and rolled it up into a stinking, hot ball. The whole mess started to smoke and unleash a demon of fumes. I went from being mad to being scared. The fire extinguisher relieved some of the tension.
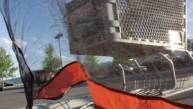
 Dirtbags beware: Resin sucks when it catches fire, and also makes your shitty trailer look even more like a meth lab.
Finishing
The hot coat is so called because good shapers add extra hardener to make it dry quickly. As I now know, this makes the resin, well, hot. But this layer is easier to spread and can work wonders on a sloppy laminating job.
Just as with laminating, the mixture of hardener to resin is important. For straight polyester resin, you’ll want to add a surfacing agent. That makes the resin dry, brittle, and easy to sand. Frustration doesn’t encompass the fury that comes with trying to sand an improperly mixed hot coat.
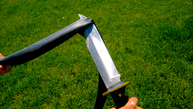
Oh yeah, somewhere in there you’ll probably want to add a fin box and leash plug— using your dull caveman chisel. Good luck with that.
Once this whole dirty process is over, you have nothing to do but sand. Sand until you’re no longer receiving lacerations when running your hands along the board. If your hot coat is shitty, add another coat—the gloss coat. Don’t mess that one up.
Unless you want your board to be a brick, be aware of how thick your resin coats are. But more than anything, make sure they don’t catch on fire.
 Sanding the rails.
Materials List
Foam blank: The sweet, defenseless body of your new board. Blanks are available in all shapes and sizes. They typically range from $60 to $200, depending on size and quality. There are two types of foam: EPS and PU. EPS is not for dirtbags. It’s for expensive epoxy construction.
Polyester Fiberglass Resin: This, along with fiberglass cloth, will make the hard outer shell of your board. You’ll need at least a gallon, which should cost between $40 and $60. For long boards (8’+), you’ll need more. This can be bought at Home Depot, but it dries with an ugly, yellowish tint. Resin specifically for surfboards is of a higher quality and clear. Make sure to get laminating resin, not sanding resin.
Fiberglass: This pretty woven fabric makes a lot of great things come to life. It is available in different weights. Surfboard makers typically use 4 oz. or 6 oz. The heavier the fabric is, the stronger the board will be. For three layers—with two on the top and one on the bottom—you’ll need between 8 and 10 yards. Make sure you get at least 27” wide, if not 30”.
Hardener: This makes the resin harden. It sometimes comes with the resin, but not always.
Surfacing Agent: This makes the resin brittle, so you can sand it. Without it, your hotcoat will dry with a softer finish that will goo up on sandpaper like boogers.
 The tools are pretty basic. Don't forget that facemask, or your cognitive functions will deteriorate as quickly as your board's finish will.
Tools List
Handplane: If you’re tight on cash and can’t afford an electric planer, get one of these handy little workhorses. They’ll trim the foam down to the right thickness, though it can take a fair amount of time.
Sandpaper: Get a lot in a lot of different grits. Heavier stuff (60 to 100 grit) is great for shaping. Lighter (150 to 220 grit) is good for sanding resin. Get a few good blocks of wood to use as sanding blocks.
Sureform: A good sureform (essentially a rasp or shaver) can take the bumps and blemishes out of your shape without causing too much trouble.
Yard stick: It serves as a measuring device and level. It’s also good for mixing resin in a pinch.
Chisel: You’ve got to get that fin box in there somehow.
Disposable paint brushes: There’s no point in trying to save brushes after you’ve dipped them in resin. Get at least two.
Rubber or plastic spreaders or squeegees: You should be able to buy a disposable pack at most hardware stores. These are absolutely necessary to laminate the board. They are different than the window washers you stole from 7-11.
Rubber gloves: Don’t get all sticky and toxic.
Mixing containers: Your mom won’t appreciate you using her Tupperware.
Facemask: You may think you’re dumb already, but wait till you’ve inhaled two quarts of polyester resin.
Stands: Get something stable to put the blank on.
Space: This is a messy process. Find somewhere that can get dirty and isn’t near a sensitive body of water. Avoid places where people may sleep. I use a hollowed out trailer my friend bought for $300.
Lights: It’s good to be able to see what you’re doing. If you can, get side-mounted fluorescents. This will help show variations in the board’s top and bottom surface.
From The Column: The Dirtbag’s Guide to Getting Shit Done
DIY Surfboards - The Dirtbag’s Guide
Fixing a Flat - The Dirtbag’s Guide
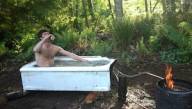
Building a Backcountry Hot Tub

8 Cougar-Hunting Tips For Mountain Town Newbies

The Ultimate Guide To Setting Up Your Own…
__video_thumb.jpg)
The 6 Things You Need to Survive Ski Town…
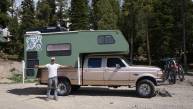
Extreme Home Makeovers: 4x4 Edition - The…
Surviving the Off-Season - The Dirtbag’s…

Finding Road Trip Partners - The Dirtbag’s…

Summer Road Trips - The Dirtbag’s Guide
Urban Camping - The Dirtbag’s Guide
About The Author
stash member Dylan Silver
California writer, photographer and dedicated blue collar representative.
Rahul ji
July 5th, 2017
Thanks sir sharing this post yah post bahut acchi hai isse ham jaise bahut sare ho help milti hai realy thanks sir.
aur apki is knowledge ko share karne ke liye thankss sir.
Isi tarah ap apna article share karte rahe sir mujhe bahut pasand hai.
mai apko bahut time se follow kar raha hu.
thanks sir realy thankss
independence day shayari
15 august shayari
Swatantrata diwas shayari in hindi
independence day status in hindi
happy independence day status
independence day quotes in hindi
independence day sms in hindi
status on independence day
happy independence day messages
15 august status in hindi
Tom Harris
January 10th, 2018
Thanks Dylan for sharing this!
Reminds me of the Lichtenboard DIY build: https://www.ambytion.com/a/s/FW8rsbwCy2sjqefc43NHaN
BackyardShaper
August 14th, 2018
Thanks Dylan.
Good to see the diy surfboard spirit is still alive. This guide helped me make my first board. A lot simpler than the other guides out there. My board didn’t catch fire, but my resin started smoking!
Https://backyardshaper.com
Ho Stevie!
January 16th, 2019
Making your own surfboard is hard!
But it doesn’t have to look pretty, it just has to work :)