
I would grind the vibram down on the non tread side before you glue it on. ISO standard is 20mm for the toe and 30 for the heel. If you put rocker on, you will have to play with those numbers a bit. Just think vibram + plastic should equal roughly those figures.Originally Posted by hick

If you grind after you glue, you are losing traction from the tread which is one the big reasons your doing it...at least that's why I've done it in the past.
Results 51 to 70 of 70
-
02-01-2008, 09:43 AM #51
 Hucked to flat once
- Join Date
- Oct 2005
- Location
- Idaho
- Posts
- 11,258
Originally Posted by Benny Profane
-
02-01-2008, 09:44 AM #52
 Registered User
- Join Date
- Jan 2005
- Location
- MA
- Posts
- 794
I figured that. Originally Posted by Conundrum
Last edited by DEVO; 02-02-2008 at 03:40 PM.
on the send bus to gnar town
-
02-01-2008, 12:55 PM #53
Registered User
- Join Date
- Feb 2004
- Posts
- 171
Timely bump!
Thinking of vibraming a pair of older Atomic BetaRace 10.20, with the totally replaceable toe and heel "blocks". Just wondering is there are some such blocks already available from Atomic with a lugged sole ( I seem to remember there was such a boot for their freeride team) and, if yes, how are they?
Am I better off with a true Vibram though?
-
02-01-2008, 03:14 PM #54
 Registered User
- Join Date
- Mar 2005
- Location
- Livingston, MT
- Posts
- 1,885
Thanks for those numbers on the iso standard. The vibrab I have had access to is pretty thick shit on the tread side, so I'm forced to grind that side. Still plenty of traction left on the toe. I'm also only using these on Salomons or in my wifes case (and others I have done them for), Fritchis. Adjustable toe height is key for my hack vibram jobs. I'm curious what mine measure now. I've just been eyeballing that shit. Originally Posted by Conundrum

-
02-02-2008, 11:31 AM #55
 Mutt Wrangler
- Join Date
- Mar 2006
- Location
- Missoula, MT
- Posts
- 22,948
Fuck you, dude. Originally Posted by BrunoOya
Salomon bindings also have adjustable toe height.
Where is Carters? (street/intersection) They have done this type of thing before? Originally Posted by hick
Sometimes I'm not the most handy person in the world (sometimes?), anyone in BZN wanna do it for me for some beer money?No longer stuck.
Originally Posted by stuckathuntermtn
-
02-02-2008, 03:13 PM #56
Registered User
- Join Date
- Mar 2005
- Location
- Livingston, MT
- Posts
- 1,885
Carter's is next to Barrel Mountaineering and Mckenzie River Pizza on Main st.
They don't vibram the ski boots (although I'm sure they would if you wanted them to), but have been very helpful as far as tips on proper glue to use and they usually have vibram in stock for 20 bucks for a pair, I can't remember what the glue costs (maybe 8?). The process is a little more involved time wise than being worth just beer money (unless you're talking about a keg).
-
02-03-2008, 10:51 AM #57
Mutt Wrangler
- Join Date
- Mar 2006
- Location
- Missoula, MT
- Posts
- 22,948
If you look at a falcon boot, the toe and heel lugs stick down just slightly lower than the middle. I was thinking of measuring the exact thickness, grinding it down even and smooth, and adding the vibram to the toe and heel where the lugs were, grinding first till it was the same thickness of what I took away. This would seem to work, but it's only about 1/8 of an inch.
Important people need their questions answered, so bump to the top. I don't wanna have to get YakTrax.No longer stuck.
Originally Posted by stuckathuntermtn
-
02-08-2008, 11:52 PM #58
Mutt Wrangler
- Join Date
- Mar 2006
- Location
- Missoula, MT
- Posts
- 22,948
^^^^well?
No longer stuck.
Originally Posted by stuckathuntermtn
-
03-10-2008, 09:24 AM #59
 Registered User
- Join Date
- Mar 2007
- Location
- CO
- Posts
- 283
I have been wanting to do this for a while and finally found the right pair of boots. I picked up these flexons from AfroMullet, dropped in some g-fits that I already had, stole the sweet purple powerstraps from an old pair of Denalis, and picked up the vibrams + glue at the local shoe repair shop.
I ground the boots down to be within the 30/20mm ISO standard taking into account the thickness of the vibrams. However, I still needed to grind more after the glueing to get the toepiece to fit properly and eject smoothly - the toe was getting stuck about halfway out (using px12s to test), which made my knees cringe a little.
Also, after a few days of use I have to report that the glue is working very well. Based upon the advice of the shoe shop, I coated the plastic (boot) with superglue first and let that dry for 24hrs. Then I used Barge to glue the vibram to the superglue surface. I later went back with Goop and filled in any gaps I could see between the sole and boot. Finally, I added brass screws here and there (I probably went a little overboard and added unnecessary weight).
I am stoked about the result - thanks for the suggestions in this thread.
Pics...

I've never felt so manly wearing bright colors.

-
12-31-2008, 11:14 AM #60
 Riff
Riff
- Join Date
- Sep 2006
- Location
- No longer somewhere in Idaho
- Posts
- 2,090
I decided to give this a try as well- I wanted stiff boots with vibram soles for patrol work and didn't really care about walk mode or a rockered sole. I loved the way alpine boots skied compared to my G-rides but hated walking around on plastic soles. I'm using them in Freerides and Barons so I don't have any worries about the release issues that come with rubber soles.
I decided not to rocker the sole, just keep it flat and at DIN height for simplicity.
I found a pair of Technica Explosion Ultras in great shape at the local thrift store. Vibram soles are $20+ at a boot shop, so I found a pair of used hiking boots with a decent vibram sole to be a donor at the same thrift store and pirated them instead of buying new.
The Explosions had removeable sole blocks and a layer of rubber to reduce vibration, which I took off. I made some measurements to get an idea of how much material to remove for the thickness of the rubber I was adding, then ground down the boot with a combination of hand tools and a belt sander. The boots had a strange adjustable arch mechanism inside the sole, so I made some adjustments for it that are visible in the pictures.
Conundrum recommended I use a 3M adhesive contact adhesive which I got at a local shoe shop that does resoling.
Once I was satisfied that the soles were ground down far enough and flat, I cut the rubber to roughly fit and screwed it to the boot so I would have screw holes to line it up with once I had applied the glue, and the screws would act as clamps while the glue dried. I used the screws that originally held the removable sole blocks in place. I also used a variety of straps and pliers to clamp the sole in place. I left each boot clamped overnight. Once I felt confident about the glue being dry I trimmed the sole with a razor knife.
The pictures of the finished product are after two weeks of daily use, and they are holding up pretty well. I don't think the boot has lost any stiffness or strength from having plastic removed, and the sole is really nice for walking, scrambling on rock, climbing ladders, snow machines and so on. The toe has peeled a little bit, but the screws aren't letting it go any further. The Scarpa liner with the soccer shin guard mod is significantly lighter than the stock liners, so they weigh just under five pounds each.
Cost:
Boots $10
Rubber $5
Scarpa liner $2 (also thrift store)
Glue $5
Time: A lot longer than I expected but worth it.Gravity always wins...
-
01-01-2009, 12:09 AM #61
glocal
- Join Date
- May 2002
- Posts
- 33,437
Did you screw into the holes that were there for the changeable toe and heel pieces?
I did this on my boots with Idris as my instructor. I think I probably posted this somewhere else in this thread. He sliced the sole off the boot and we were faced with those hollow spots, but went ahead with the hot shoe glue vibram attachment and no screws. Other than adding too much height (I topped out both Salomon and Freeride toepiece adjustments), it worked just fine. I sanded the vibram down until they fit in bindings.
The only problem I had was when the heel vibram pulled away from the plastic of the shell. There's not a lot in those hollow heels to glue it to with all those voids. I just poured a bunch of fiberglass resin in there and clamped it for a few days and all was fine.
-
03-06-2009, 01:48 PM #62
 the terminator
- Join Date
- Jan 2009
- Location
- Warrington, UK
- Posts
- 152
Here's my second attempt on a pair of Flexons.

I used some 6mm nora® Lunasoft Mini Non Slip EVA as the soling material. I avoided conventional Vibram as it is too thick. Checking my boots against ISO9523-1990 I found I had only 6mm of height to spare on the heels - unless I carefully ground away the plastic on the top of the lug.
I fixed it to the boot using Dow Corning 3145 RTV high-strength silicone. First time, I used a load of pebbles inside the boot to hold it down but this time I made a clamp from bits of timber:

-
03-06-2009, 02:50 PM #63
 Registered User

- Join Date
- Oct 2003
- Location
- Seattle
- Posts
- 5,481
It's pretty interesting that since this thread was started a number of heavier, stiffer alpine-like AT boots have become available. I think that the market actually listened to the consumer on this one...
-
03-07-2009, 06:37 AM #64
 Registered User
- Join Date
- Jan 2008
- Location
- Arlington, VA
- Posts
- 160
this is sweet, pumped to see more people doing this. i (well my shop did all the work i just sat there like a giddy little school girl!) just did this to my lange plug boots...took the vibram soles off of the lang banshee pro...that way the AFD still releases properly. and word on the street is lange is coming out with vibram lifters next year to make this way easier - there was a little bit of grinding to be done to make my setup work.
-
03-07-2009, 12:26 PM #65
 dirka dirka?

- Join Date
- Mar 2006
- Location
- Whistler
- Posts
- 1,013
Yeah, my roomate did the same for me to my atomic plugs. Just grind all the nubs off the Lange/Rossi vibram soles and screw em straight to the planed bottom of the boots, no glue needed... Killer for scrambling and sledding. Originally Posted by SkiFreak85353
Life, Liberty and the Pursuit of Powder
-
03-27-2009, 01:53 PM #66
Hemsedal
- Join Date
- Dec 2007
- Location
- Hemsedal
- Posts
- 61
I wonder when Dalbello will wake up.. Originally Posted by Dromond
-
04-11-2009, 11:13 AM #67
the terminator
- Join Date
- Jan 2009
- Location
- Warrington, UK
- Posts
- 152
My Mark II's above were not a success - principally due to the height of the heel.
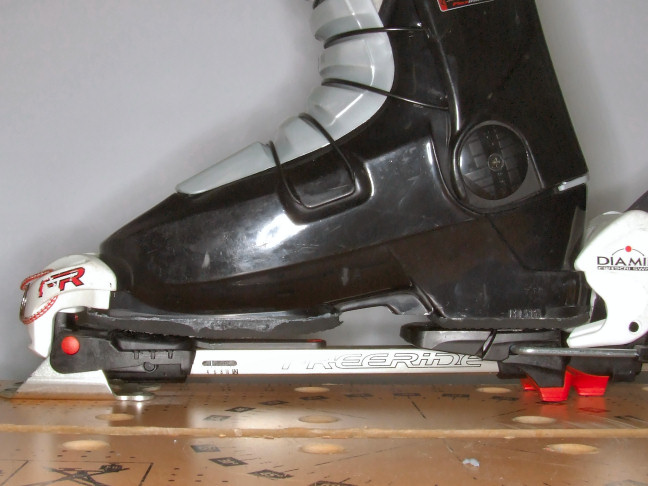
Alpine boots are bound by ISO 5355 which specifies a heel height of 30mm +/- 1mm. Touring boots are bound by ISO 9523 which specifies a heel height of 32mm +/- 3mm. In order to maintain strength and allow the possibility of adding Dynafit inserts I only gave the boot sole a very light sanding. After I fitted the 6mm Lunasoft soling the heel height came to exactly 35mm - high, but just within the spec for touring boots. However, when we came to try them with the Freerides they kept popping out. This was because the binding simply cannot cope properly with this heel height.
On to Mark III's!
This time I took the soles down until the circles just disappeared. This also helped to take out the slight upwards bow in the sole surface which, I guess, is produced by the boot shrinking after it is moulded.

Then I used 6mm Lunasoft to sole the heel and 10mm on the toe. To provide some rocker I sanded the smooth side down to 4mm at the front and 7mm at the back. To achieve this accurately I nailed the rubber to a piece of timber. The two nails marked the inside edge of the chamfer and two wood screws set the depth at the outside. I just kept sanding away on the bench sander until I heard the scraping of metal. The next photo shows how I used some hard 1mm EVA sheet to create the right shape for the clamp. This time I used Renia Ortec contact adhesive and clamped the sole for at least 24 hours. This worked very well.

The result looks good in a Freeride binding. And it works well too: we have just returned from a 5-day tour of the Vanoise and the boots held up fine.
-
04-11-2009, 12:14 PM #68
Mutt Wrangler
- Join Date
- Mar 2006
- Location
- Missoula, MT
- Posts
- 22,948
that is awesome.
Do you some supply of old flexons or something?No longer stuck.
Originally Posted by stuckathuntermtn
-
04-11-2009, 12:30 PM #69
the terminator
- Join Date
- Jan 2009
- Location
- Warrington, UK
- Posts
- 152
At least here in the UK, old Flexons tend to be very cheap on eBay - presumably because they just look so weird. I'll pick up any that are going really cheap just to get the spare parts but keep an eye out for those that are the right size, especially ones that have moulded liners. Shells of the wrong size can always be used for experimental surgery


-
04-12-2009, 03:21 PM #70
 Shama-lama-Ding-JONG!
- Join Date
- Apr 2008
- Location
- In the mountains
- Posts
- 118
I love glue!
"I'm looking pretty good, don't you think?" - the other says "watching you ski is like watching a retarded monkey rollerblade on a gravel road"
www.majesticheliski.com

 Reply With Quote
Bookmarks